Let’s talk about PBXes
Baby.
So let’s say you’ve got a phone bill that’s quite large, so you want to convert your vast number of analog phone lines to VOIP, except for the one analog line you’re keeping around in case anything goes horribly pear-shaped.
There’s a product out there called MyPBX Soho which will do that for you, unless you want to also record phone calls for Training Purposes, in which case you have to shell out $3,000 for a MyPBX Enterprise, which you’re not going to do because you’ve developed cheapness as some kind of innate sixth sense.
Why not set up an Asterisk server on a virtual machine, hook that up to your VOIP provider, get a MyPBX Soho box to handle your analog calls, and start raking in the cash, assuming you pay your phone bills in cash and you own a rake.
What do I need ?

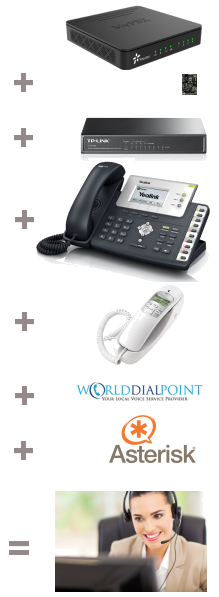
- First of all, pick up a MyPBX Soho server[1] (USD$281.03 on ebay, you could probably get them cheaper).
- You’ll also need an FXS/FXO Module (USD$77.68, also on ebay). This is a little circuit board that clips into the MyPBX box and allows you to plug it into both a landline phone (FXS) and the hole in the wall (FXO). You can get more FXS modules or FXO modules if that’s the sort of thing you want to do, or a GSM or UMTS module if you want to slot in a SIM card to create a mobile phone that never moves.
- You’ll also need a router that supports PoE to power the phones, so let’s say a TP-Link TL-SF1008P from Umart ($59.00)
- Then you’ll need some Yealink T26P VOIP handsets from ebay ($99.00 each, Free P&P).
- If you don’t have one, grab an analog phone, preferably one that still operates when the mains power is out (i.e. has a handset connected via a cable).
- Purchase a wdpvoip $15.00/month pre-paid business plan, and throw another $7.95 a month at them for a phone number that looks like a phone number. This will give you 15 concurrent calls, with 10c/call to landlines and 18c/minute to mobiles. Feel free to shop around.
- You’ll also need an asterisk server. I opted for the FreePBX web frontend running on Ubuntu, running in a VMWare Workstation hypervisor.
- Extraordinary amounts of spare time
What you want to do, apparently, is to set up a PBX in which asterisk will handle all calls (so that everything is recorded) predominantly over the VOIP provider to save cash, but has bypasses in place if you want to use the analog line, what with your internet provider being as flaky as an exzhema patient from flakeberg who just dropped out of the flake academy and started a diet consisting of nothing but cadbury flakes. That flaky.
Anyway.
I dub thee bnepbx01
Once you’ve got all the bits and pieces listed above, you can start plugging things in, assigning names and numbers to things, putting stickers onto those things so you don’t forget what their names are, and ensure that you can communicate to everything on the network. These days I generally name things in the form data-centre-TLA+closest-IATA-airport-code+what-the-hell-it-is-TLA+(sequence number), omitting the data centre prefix for anything that I can physically touch with my own hands.
My initial setup, with two digital handsets and one analog handset, will look like this:
| DNS name | IP address | Thing |
|---|---|---|
| bneast01 | 192.168.0.120 | The Asterisk server |
| bnepho01 | 192.168.0.121 | VOIP phone (extension 101) |
| bnepho02 | 192.168.0.122 | VOIP phone (ext 102) |
| bnepbx01 | 192.168.0.123 | Soho MyPBX (ext 103) |
The imaginary phone numbers I’ll be using below are
| Provider | Number | Thing |
|---|---|---|
| wdpvoip | 07 5555 1111 | The digital wdpvoip line |
| telstra | 07 5555 2222 | The analog wall-socket line |
(Because I know nothing about telephones, I’m going to call a standard telephone handset and line ‘analog’, and anything that goes over the internet ‘digital’).
Setting up FreePBX / Asterisk (bneast01)
For the Asterisk server, download a 32-bit Ubuntu 14.04.1 (trusty) LTS image, fire that up with about 16GB HDD and 1GB RAM.
Then run these commands (mostly sourced from the instructions at Installing FreePBX on Ubuntu 12.04 Server (Precise Pangolin) ):
sudo apt-get install openssh-server
cd /usr/local/src
sudo wget https://iksemel.googlecode.com/files/iksemel-1.4.tar.gz
sudo tar xzf iksemel-1.4.tar.gz
cd iksemel-1.4/
sudo ./configure
sudo make
sudo make install
cd /usr/local/src
sudo wget http://downloads.asterisk.org/pub/telephony/dahdi-linux-complete/dahdi-linux-complete-current.tar.gz
sudo tar xvzf dahdi-linux-complete-current.tar.gz
cd dahdi-linux-complete-2.10.0+2.10.0/
sudo make all
sudo make install
sudo make config
cd /usr/local/src
sudo tar xvzf libpri-1.4-current.tar.gz
cd libpri-1.4.15/
sudo make
sudo make install
cd /usr/local/src
sudo git clone http://git.freepbx.org/scm/freepbx/framework.git freepbx
export VER_FREEPBX=2.11
cd freepbx
sudo git checkout release/${VER_FREEPBX}
sudo adduser asterisk --disabled-password --gecos "Asterisk User"
sudo chown asterisk. /var/run/asterisk
sudo chown -R asterisk. /etc/asterisk
sudo chown -R asterisk. /var/{lib,log,spool}/asterisk
sudo chown -R asterisk. /usr/lib/asterisk
sudo mkdir /var/www/html
sudo chown -R asterisk /var/ww
sudo chown -R asterisk /var/www
sudo sed -i 's/(^upload_max_filesize = \).*/\120M/' /etc/php5/apache2/php.ini
sudo sed -i 's/\(^upload_max_filesize = \).*/\120M/' /etc/php5/apache2/php.ini
sudo cp /etc/apache2/apache2.conf /etc/apache2/apache2.conf.orig
sudo sed -i 's/\(User\|Group\).*/\1 asterisk/' /etc/apache2/apache2.conf
sudo service apache2 restart
sudo vi /etc/apache2/apache2.conf
sudo cp /etc/apache2/apache2.conf.orig /etc/apache2/apache2.conf
sudo sed -i 's/^\(User\|Group\).*/\1 asterisk/' /etc/apache2/apache2.conf
sudo service apache2 restart
export ASTERISK_DB_PW=abc123
mysqladmin -u root create asterisk -p
mysqladmin -u root create asteriskcdrdb -p
mysql -u root asterisk -p < SQL/newinstall.sql
mysql -u root asteriskcdrdb -p < SQL/cdr_mysql_table.sql
mysql -u root -p -e "GRANT ALL PRIVILEGES ON asterisk.* TO asteriskuser@localhost IDENTIFIED BY '${ASTERISK_DB_PW}';"
mysql -u root -p -e "GRANT ALL PRIVILEGES ON asteriskcdrdb.* TO asteriskuser@localhost IDENTIFIED BY '${ASTERISK_DB_PW}';"
mysql -u root -p -e "FLUSH PRIVILEGES;"
sudo ./start_asterisk start
sudo ./install_amp --webroot /var/www
sudo amportal a ma installall
sudo amportal a reload
sudo ln -s /var/lib/asterisk/moh /var/lib/asterisk/mohmp3
sudo amportal start
cd /usr/lib/asterisk/modules/
sudo wget http://asterisk.hosting.lv/bin/codec_g729-ast110-gcc4-glibc-pentium4.so
sudo chown asterisk:asterisk codec_g729-ast110-gcc4-glibc-pentium4.so
sudo chmod a+x codec_g729-ast110-gcc4-glibc-pentium4.so
sudo /etc/init.d/asterisk restart
sudo asterisk -rx 'core show translation'
sudo asterisk -rx 'sip show channels'
sudo asterisk -rx 'sip show peers'
sudo asterisk -r -vvvv
That last command will put asterisk into remote verbose mode, so you'll be able to see on the command-line what's currently not working properly. There's also logs in /var/log/asterisk.
Now that you've got FreePBX, Asterisk and the G729 codec installed, try connecting via a web browser to your FreePBX installation, to MyPBX and to your phones, update your firmware, set up your SIP accounts, trunks, extensions and incoming/outgoing routes, and then everything will work first time honest.
Despite FreePBX and MyPBX both being based on Asterisk, you'll find they have slightly different terminology for the same thing, so that will make things more entertaining.
Huh?
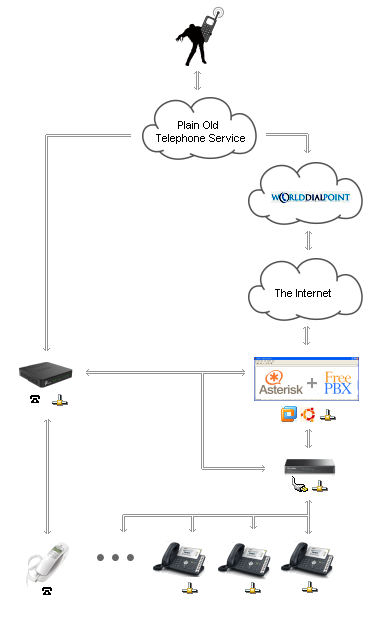
Here's a network diagram describing the proposed configuration, using industry-standard white-puffy-clouds to depict anything you don't have direct and complete control over.
Select the big chunky buttons on the side to view the different trunks and routes you'll be configuring for this thing.
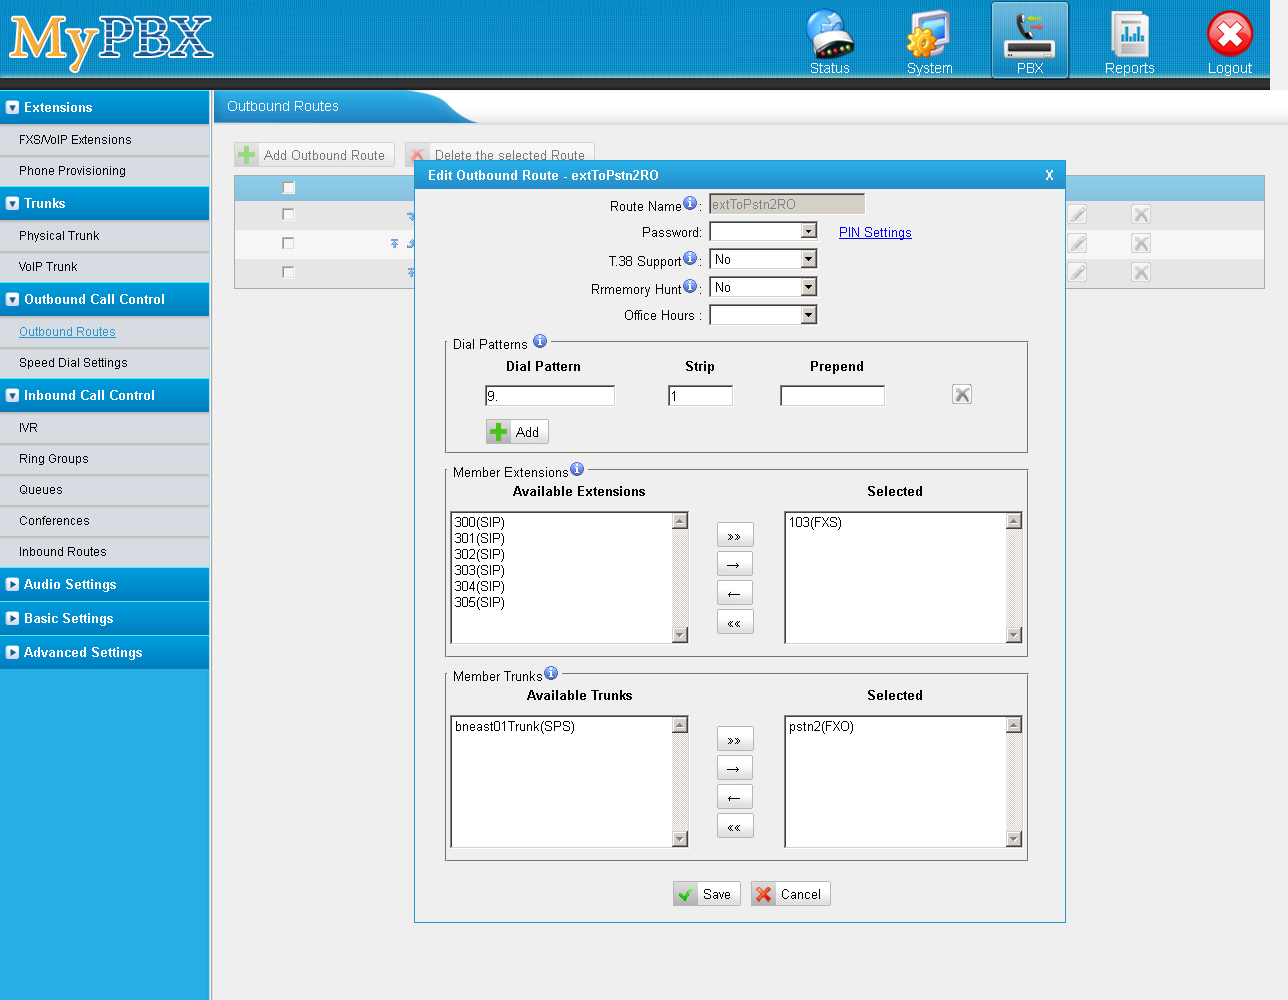
MyPBX Outbound Route: extToPstn2RO
MyPBX Trunk: pstn2
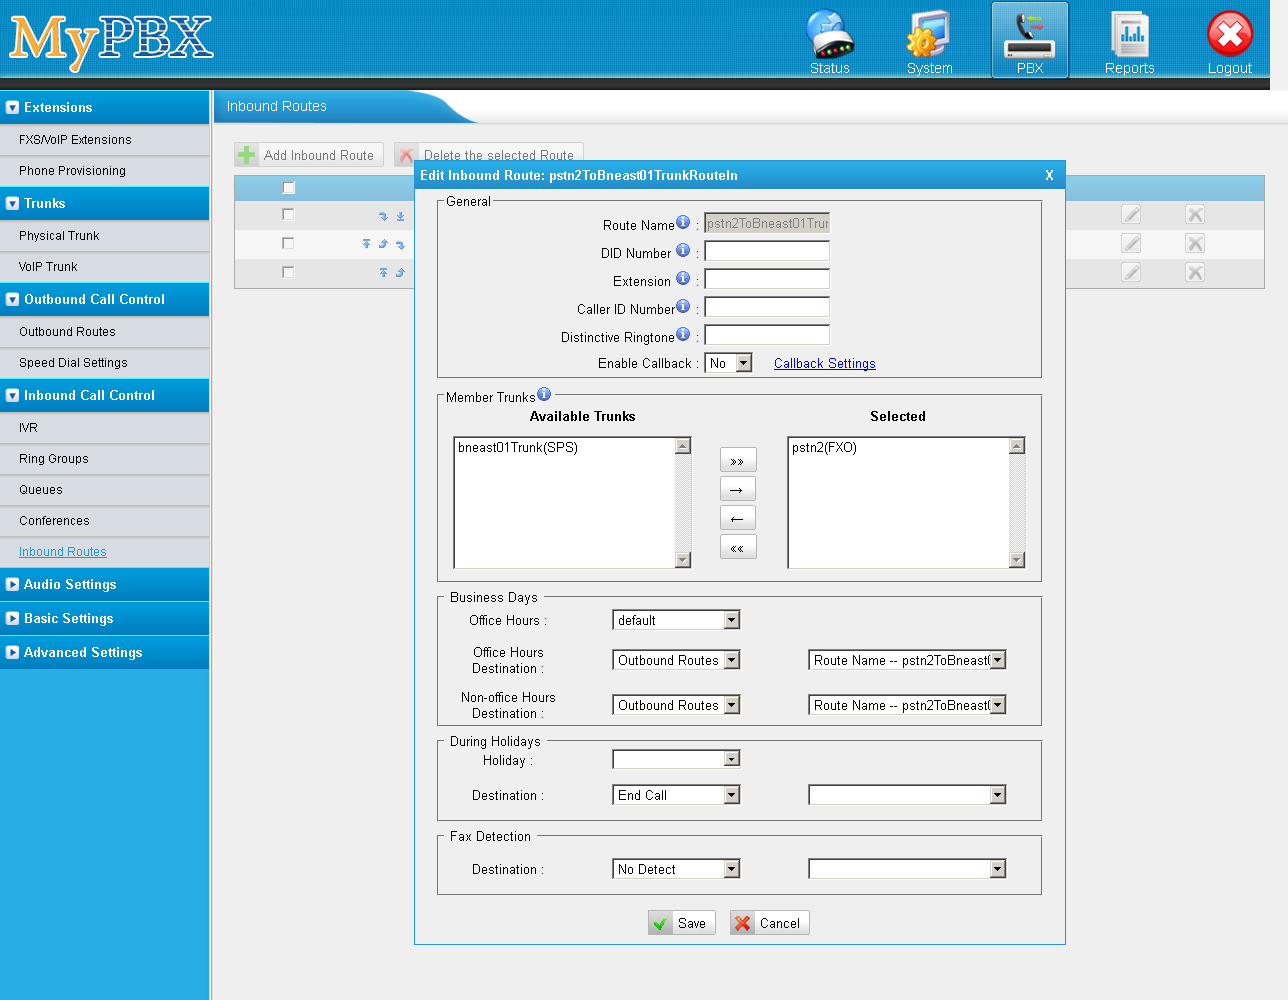
MyPBX Inbound Route: pstn2ToBneast01TrunkRouteIn
MyPBX Trunk (Inbound): pstn2
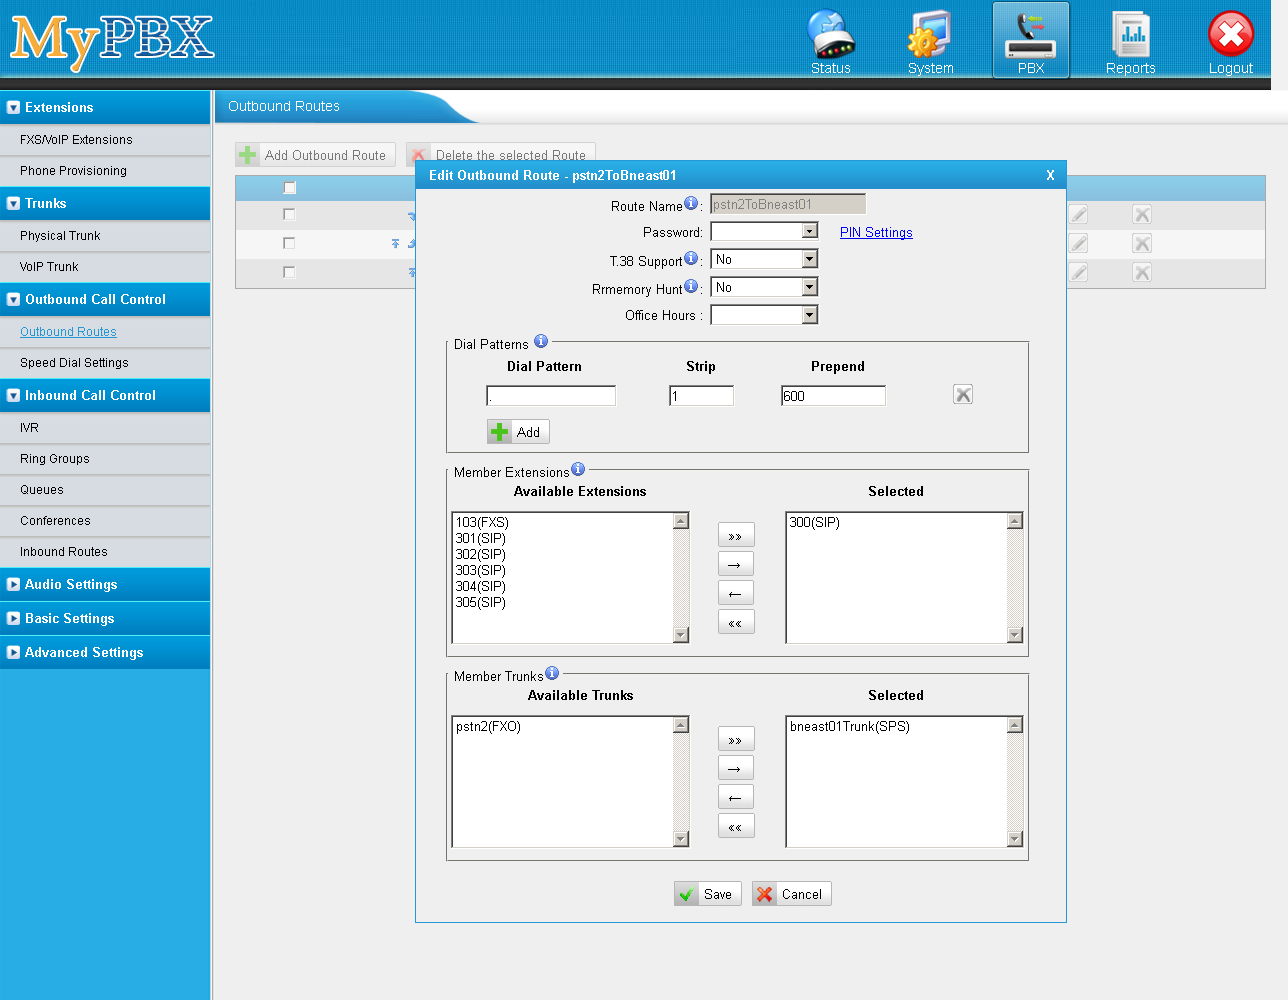
MyPBX Outbound Route: pstn2ToBneast01
MyPBX Trunk (Outbound): bneast01Trunk
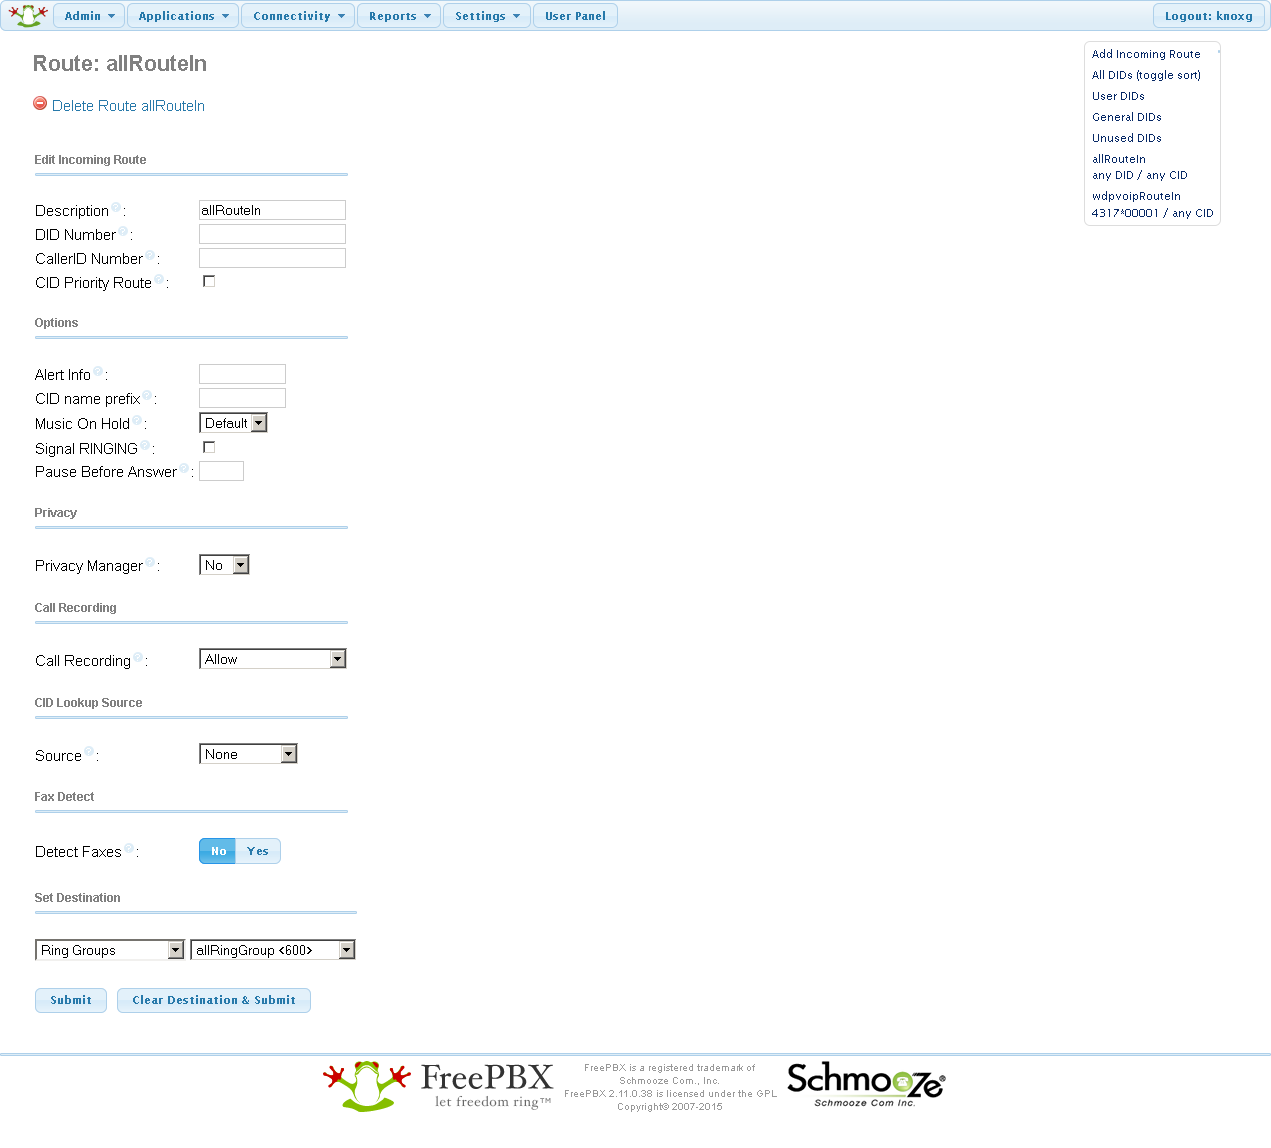
FreePBX Inbound Route: allRouteIn
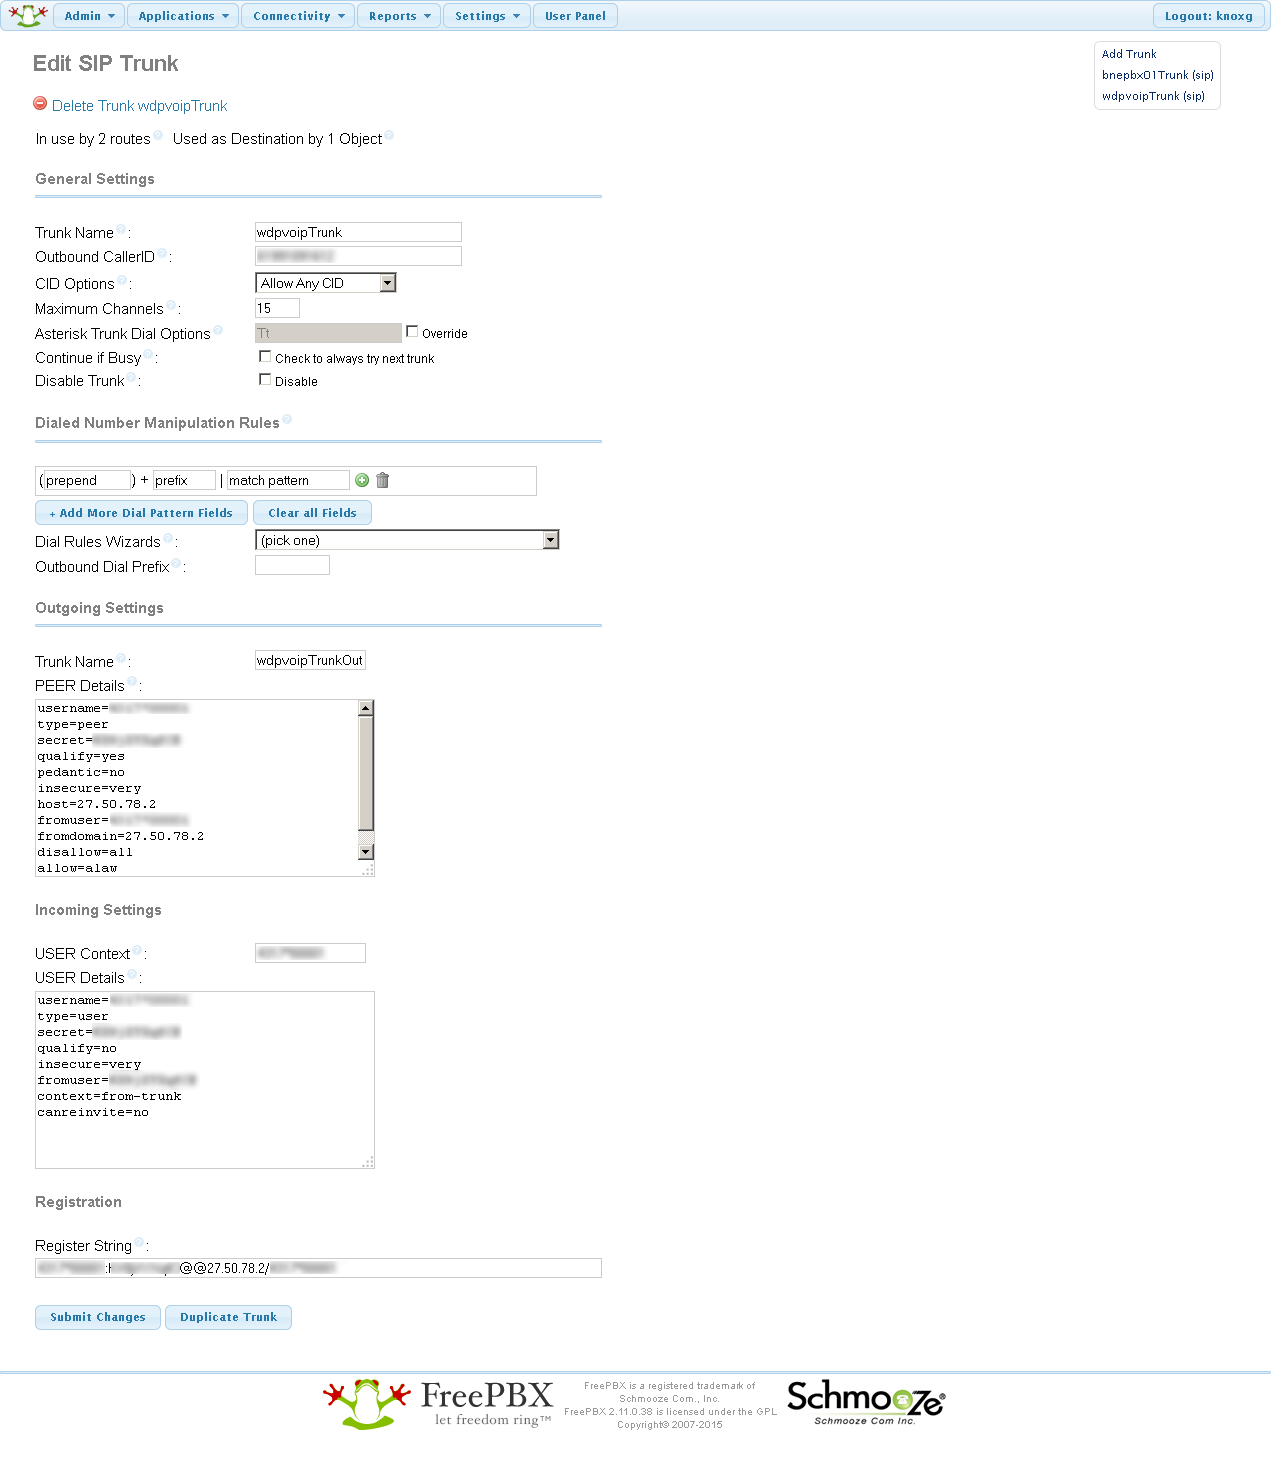
FreePBX Trunk: bnepbx01Trunk
FreePBX Ring Group: allRingGroup
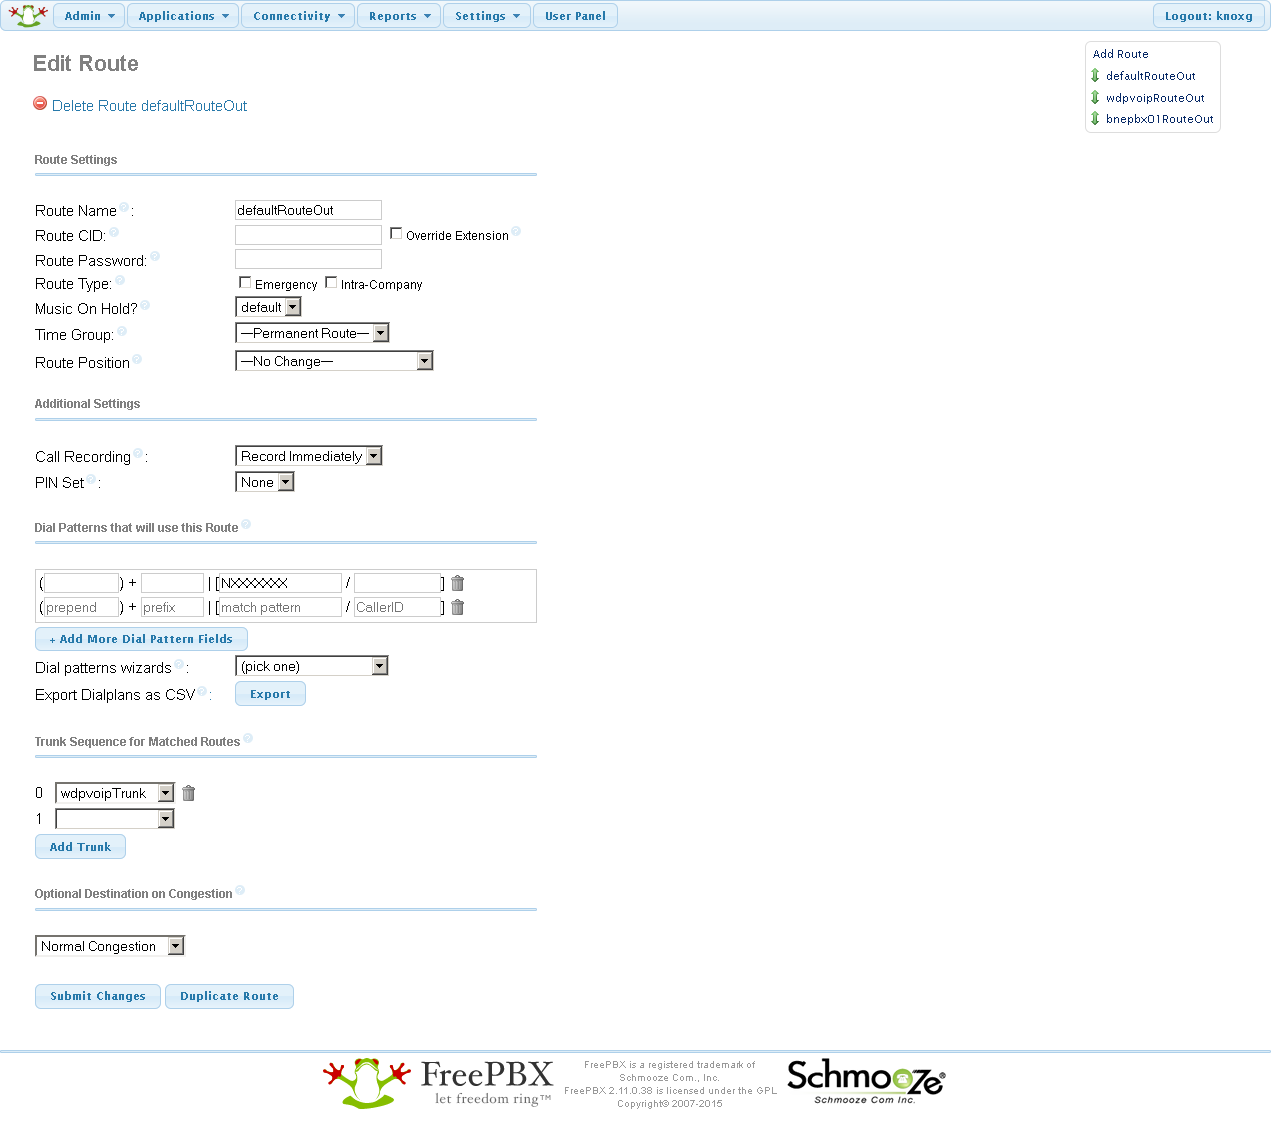
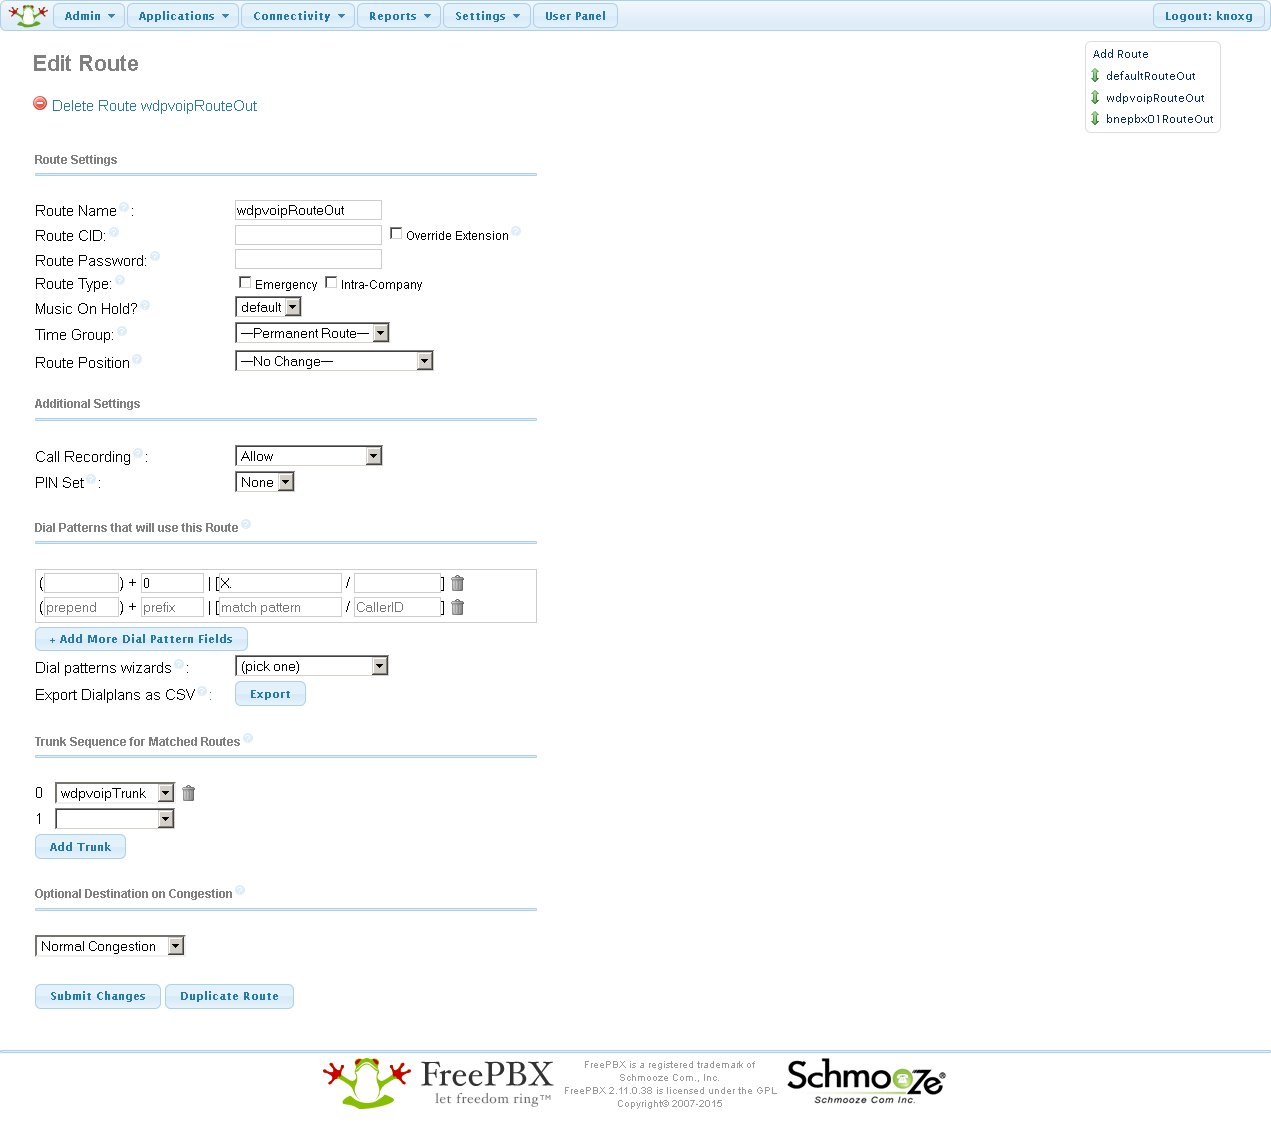
This path allows calls to originate from the VOIP handsets, go via the Asteriak server through to wpdvoip and onwards to the outside world.
FreePBX Outbound Route: wdpvoipRouteOut
FreePBX Trunk: wdpvoipTrunk
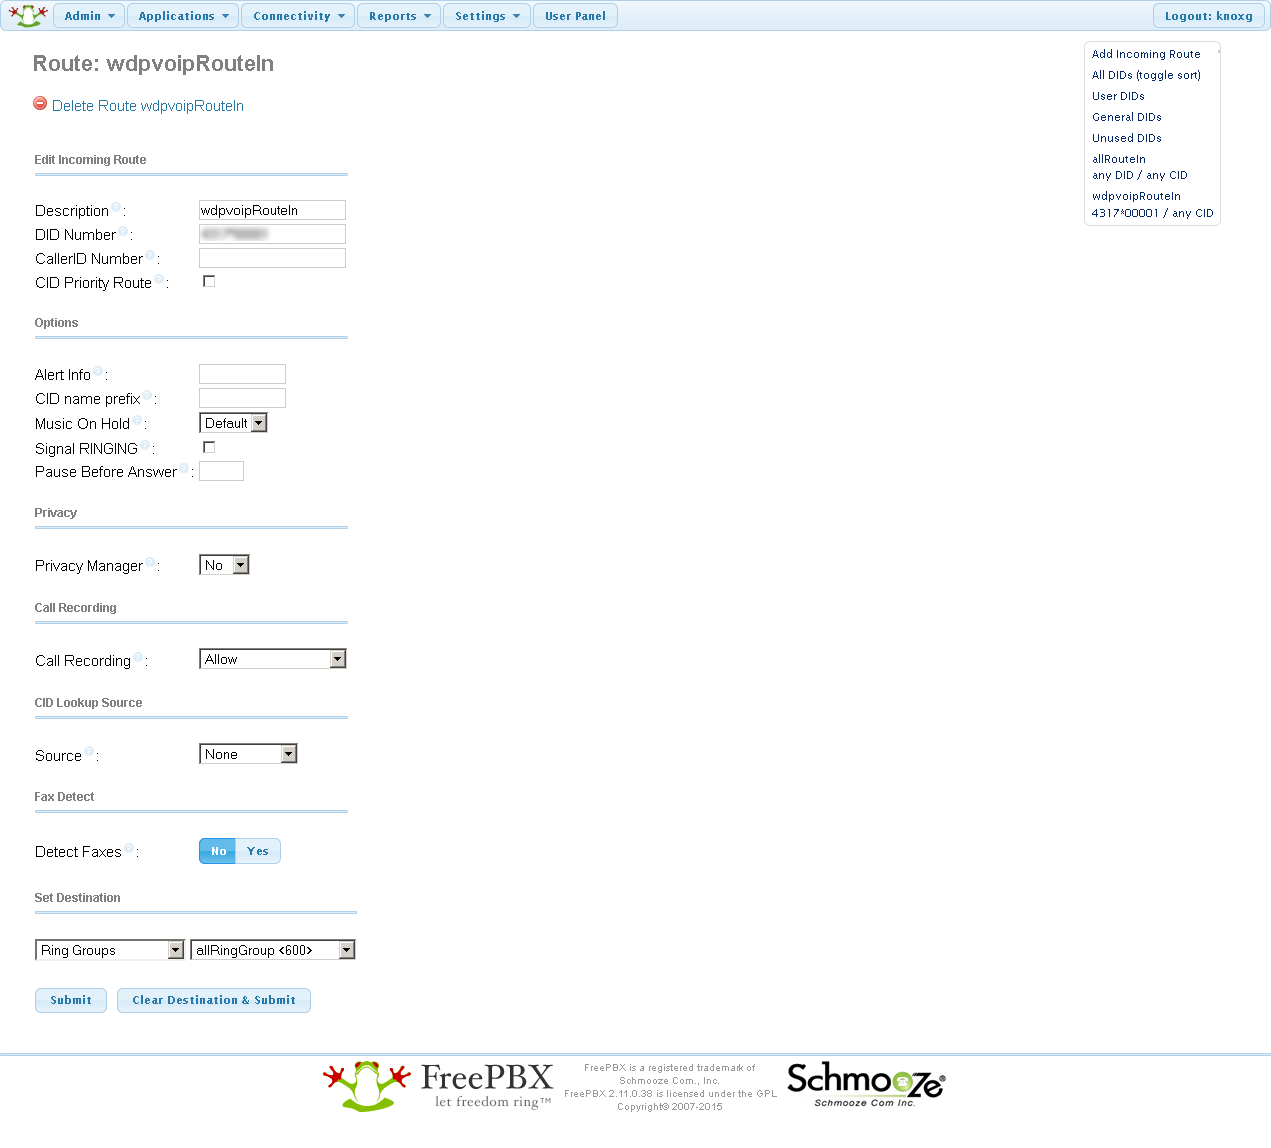
This path allows calls from the outside world to the wdpvoip number (07 5555 1111), go be received by the Asterisk server and sent through to the ringgroup which includes all the digital phones.
FreePBX Inbound Route: wdpvoipRouteIn
FreePBX Trunk: wdpvoipTrunk
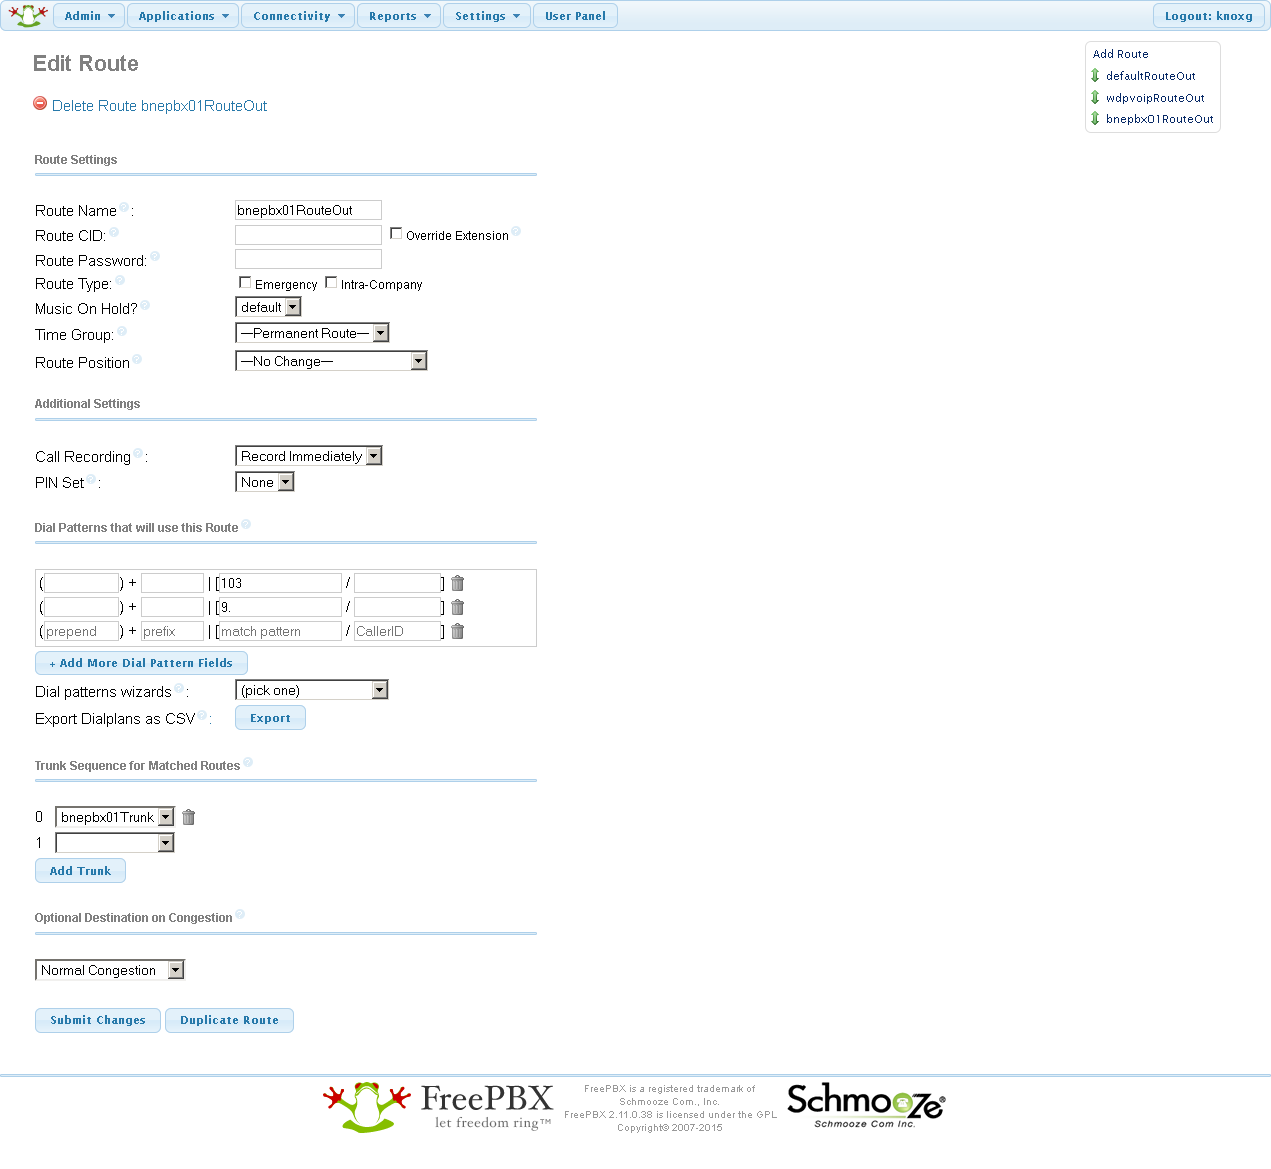
In the event that something goes wrong with the internet, this path allows the digital phones to use the analog line to call out. Ideally this would be automatic, but for now people will need to dial a '9' prefix to get the outside analog line.
FreePBX Outbound Route: bnepbx01RouteOut
FreePBX Trunk: bnepbx01Trunk
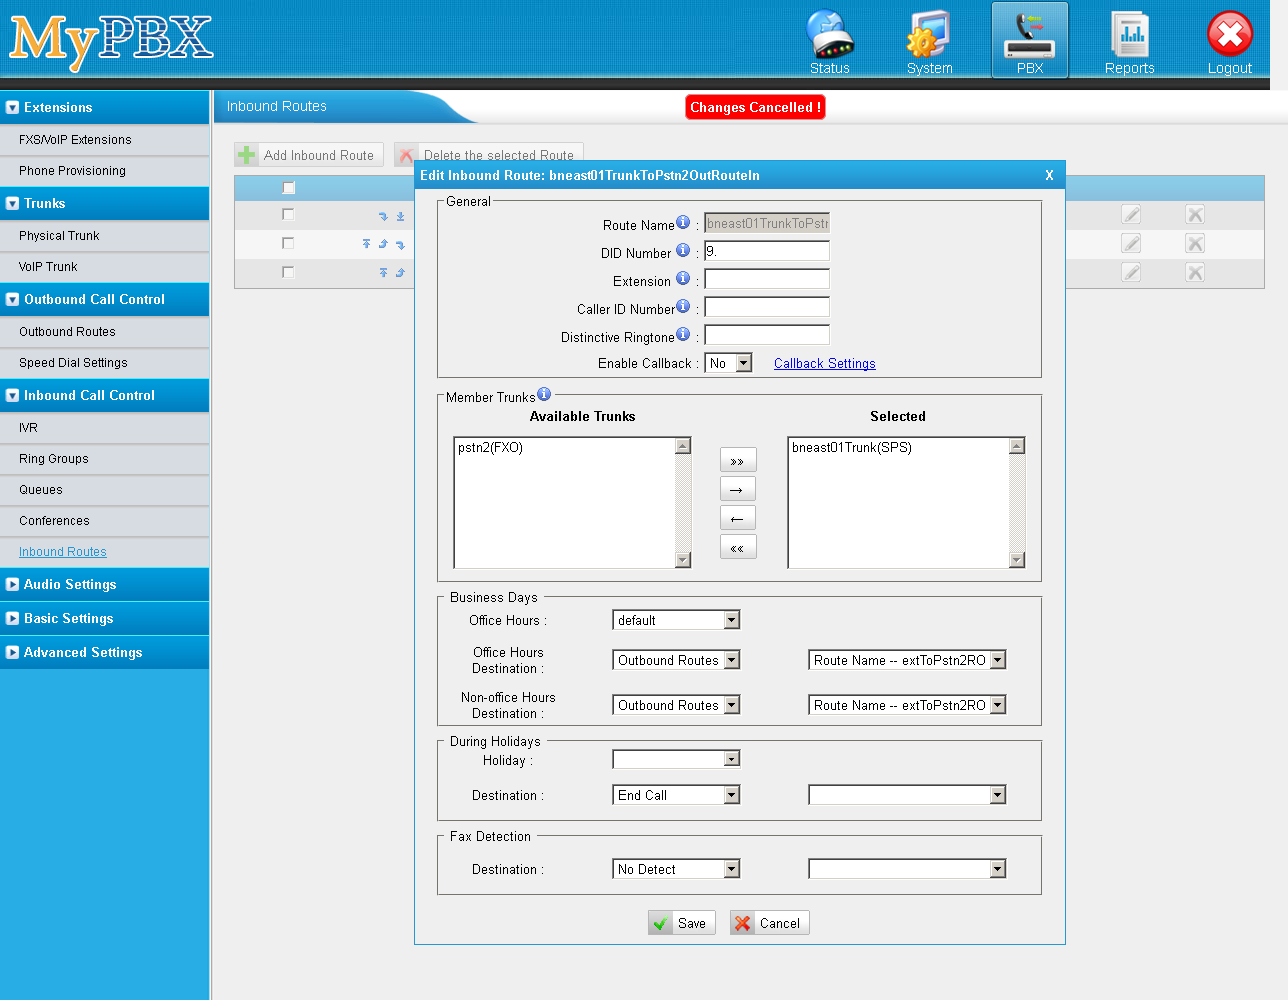
MyPBX Inbound Route: bneast01TrunkToPstn2OutRouteIn
MyPBX Trunk (Inbound): bneast01Trunk
MyPBX Outbound Route: extToPstn2RO
MyPBX Trunk (Outbound): pstn2
Not really necessary, but would be good if the digital handsets (ext 101 and 102) could call the analog handset (ext 103)
FreePBX Outbound Route: bnepbx01RouteOut
FreePBX Trunk: bnepbx01Trunk
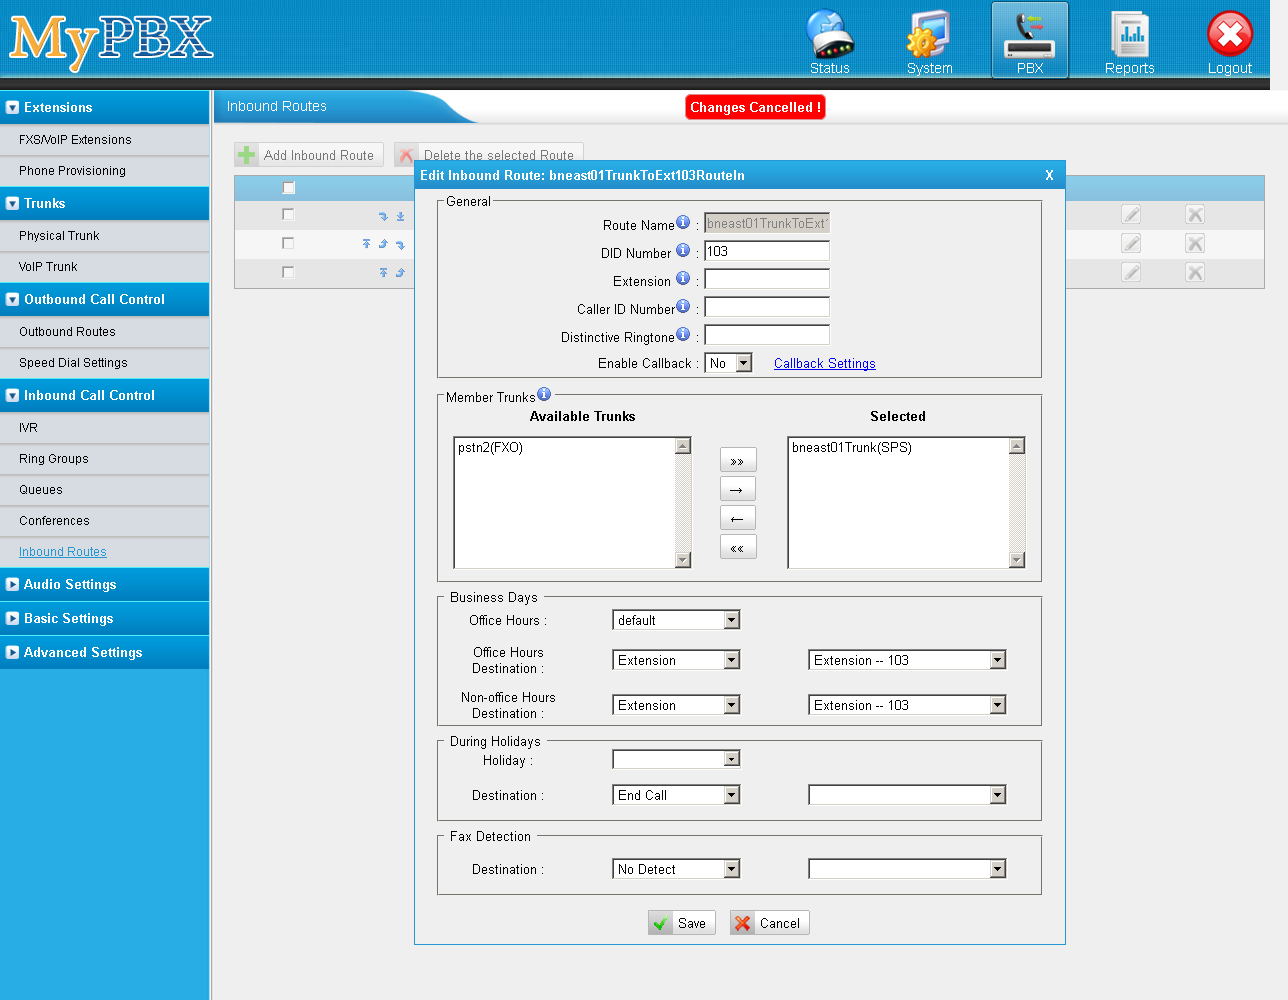
MyPBX Inbound Route: bneast01TrunkToExt103RouteIn
MyPBX Trunk (Inbound): bneast01Trunk
And conversely, the analog handset (ext 101) should be able to call the digital handsets (ext 101 and 102)
MyPBX Outbound Route: extToBneast01RO
MyPBX Trunk (Inbound): bneast01Trunk
FreePBX Inbound Route: allRouteIn
FreePBX Trunk: bnepbx01Trunk
If/when the power (and UPSes) go out, it will still be possibly to make calls on the analog line, which uses a feature on the FXS/FXO circuit which permits calls when no power is available.
This isn't really a path, considering there's no settings to configure, but it's still part of the overall configuration.
Wha?
With that in mind, here's the exciting details.
You'll probably want to check the different systems as you configure things to make sure the connections vaguely work.
MyPBX configuration
Pry the top off the MyPBX to expose the slots inside (outlined in red). My FXO/FXS card is in the first slot, so port 1 on the back is the analog handset, and port 2 plugs into the phone socket on the wall.
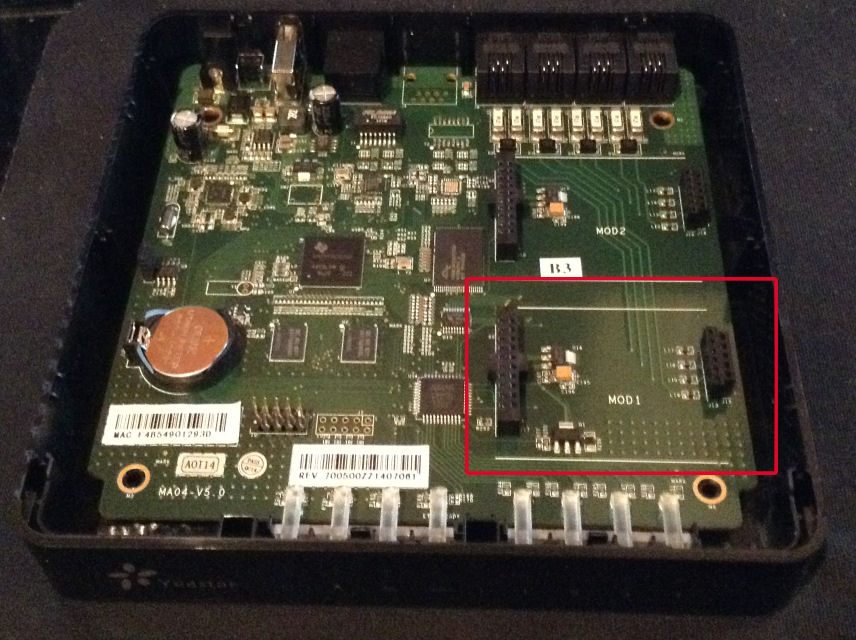
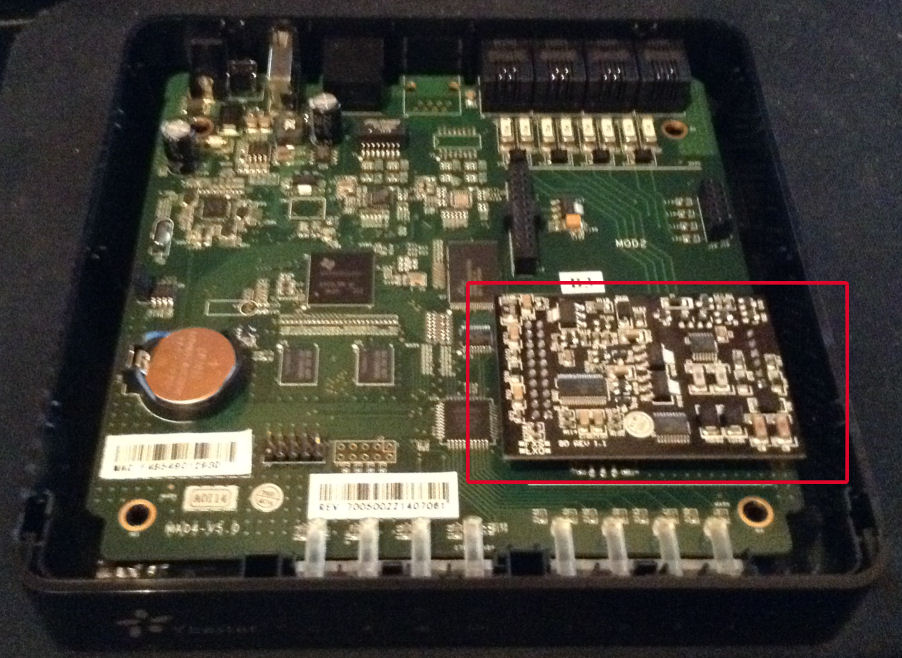
Put the cover back on, connect the ethernet, phone and power cables and turn it on. By default the MyPBX box is on a weird subnet (192.168.5.0/24) [2], so change your laptop IP address to something on the same subnet (e.g. 192.168.5.1), connect to http://192.168.5.150, log in (as admin / password), change the network settings by clicking the 'System' link up the top, then 'LAN Settings' on the side, save the changes then change your laptop IP address back.
When you log back into the MyPBX console (for me, on http://192.168.0.123 ), turn on the debug log (Reports->System Log->Enable Hardware, Normal, Debug and Web logs) and the SSH server (System->Security Center->Service->SSH->Setting), and log in via SSH (192.168.0.123 port 8022, username/password = root/ys123456) and tail -f /var/log/yslog/debug.log, which will be useful when things inevitably don't work.
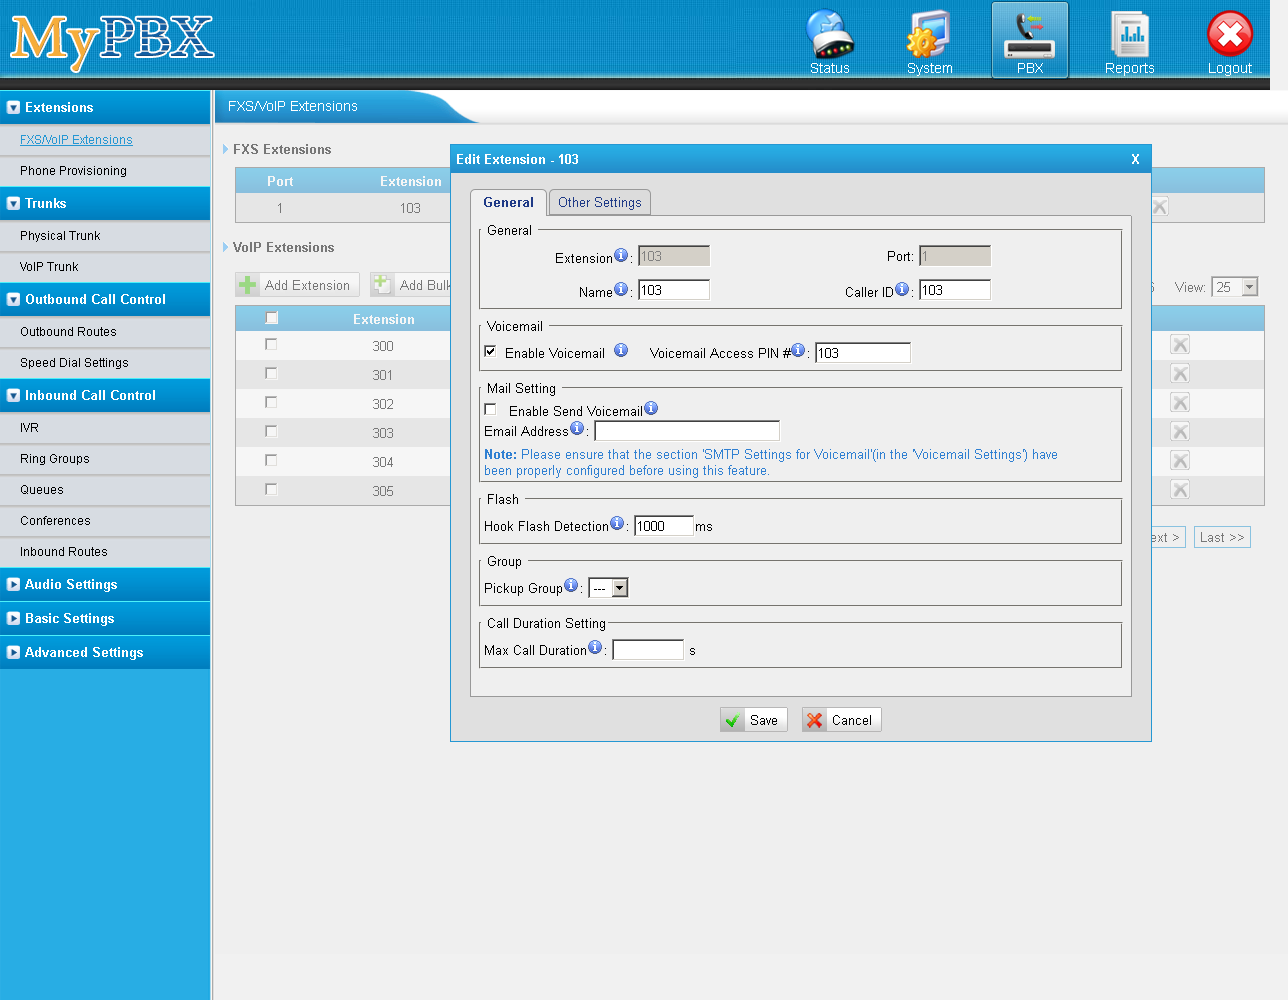
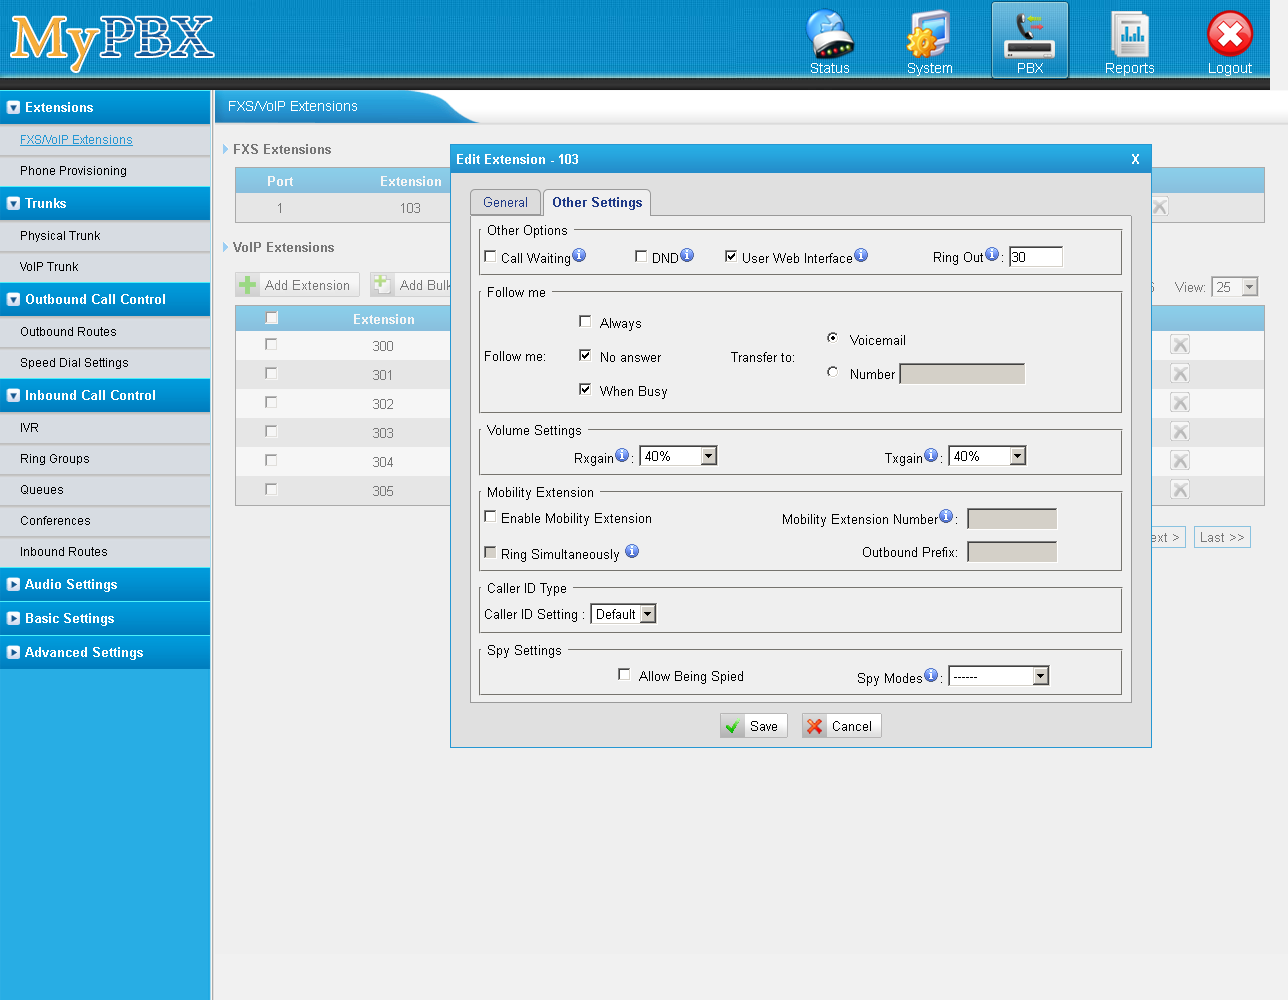
Back in the web console, click 'PBX' -> 'FXS/VOIP Extensions'. You'll find some existing VOIP extensions already set up (ext 300-305) which you can ignore. Click 'Add extension' and create the new analog extension 103 with the settings:
Then click 'PBX' -> 'Physical Trunk', and you should see a pstn2 trunk already set up.
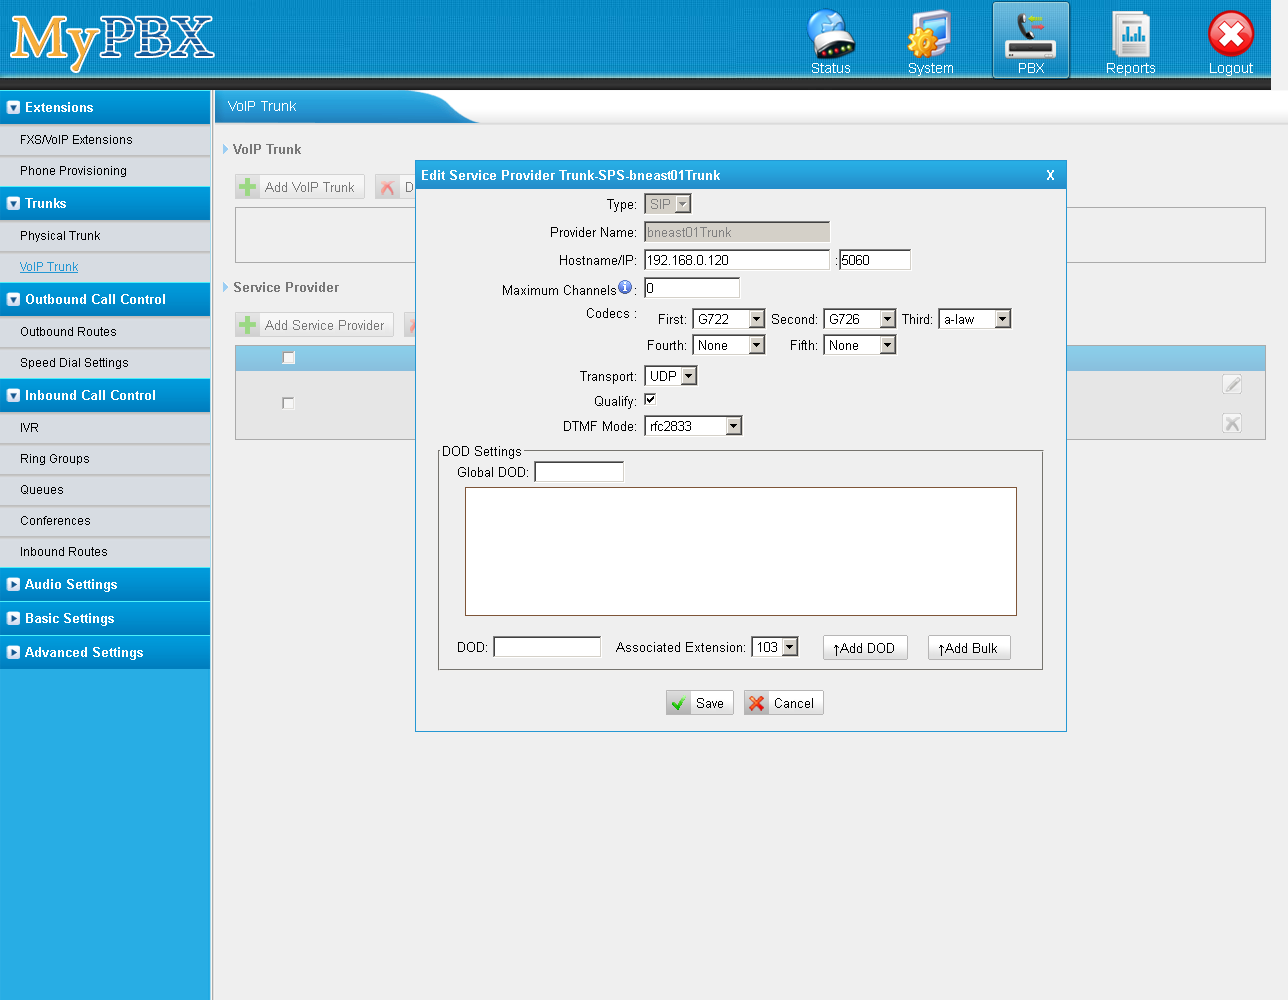
Add a 'Service Provider' called bneast01Trunk with the settings:
This trunk will handle communications over SIP for VOIP traffic from the asterisk server bneast01.
Click 'Outbound Routes' and add the following routes. MyPBX has a 15-character limit for outgoing route names, so I had to condense my initial names for these things into an even more incomprehensible form. You'll need routes for outgoing analog (extToPstn2RO), digital (extToBneast01RO) and external incoming (pstn2ToBneast01) calls:
**- this extension isn't used, but MyPBX requires something in here, so put in anything.
Note the two dial patterns on bneast01Out; the first is for calls to other extensions (which in my configuration all start with '1'), the second is for outgoing external calls (which in my configuration require the user to dial '0' to get an outside digital line).
Inbound routes on the MyPBX also configure the handling of those routes:
Asterisk / FreePBX configuration
Log in to FreePBX at http://192.168.0.120 using the username / password you created earlier, if you did, which I forget.
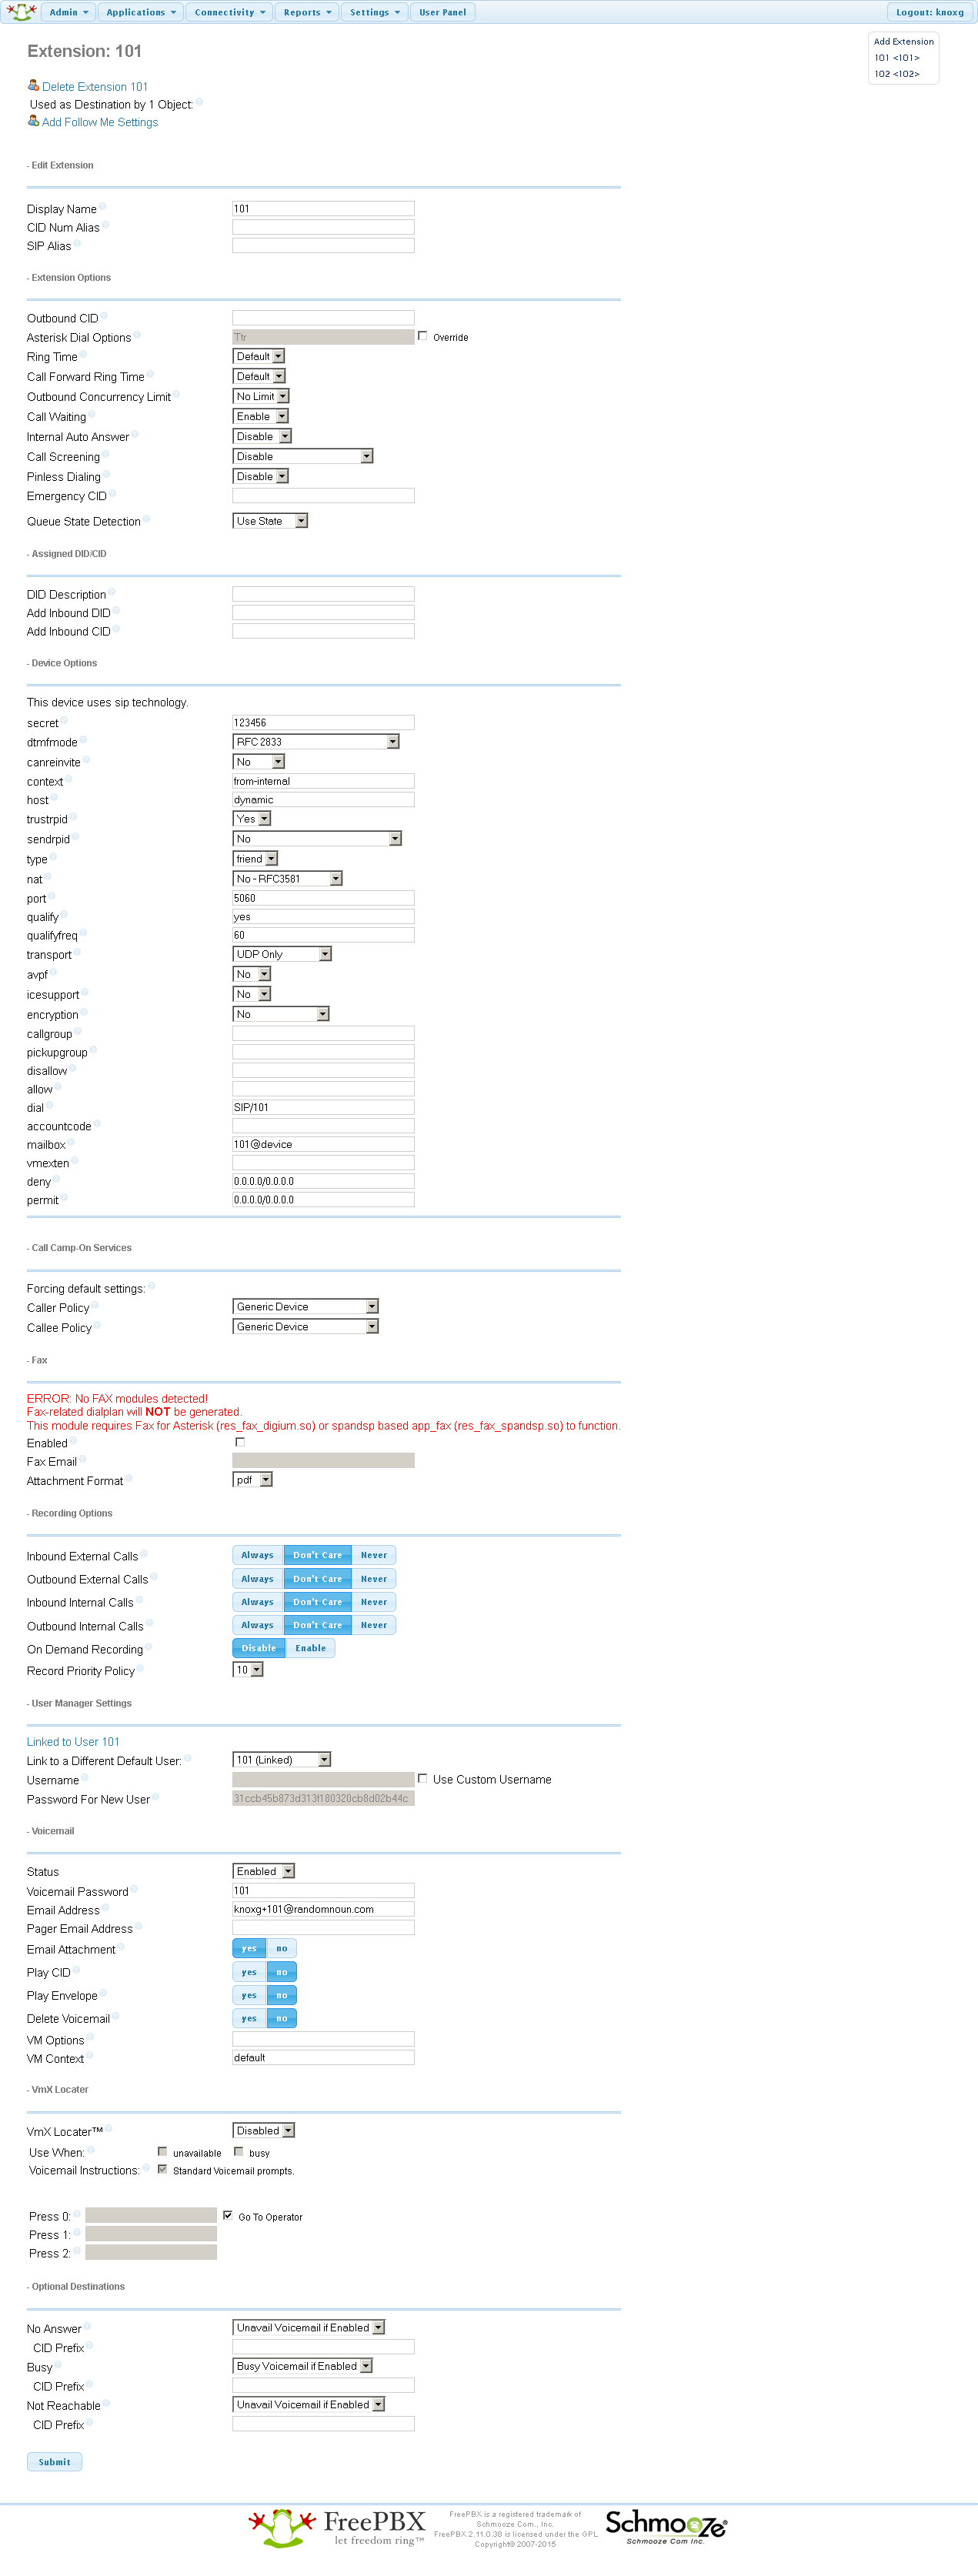
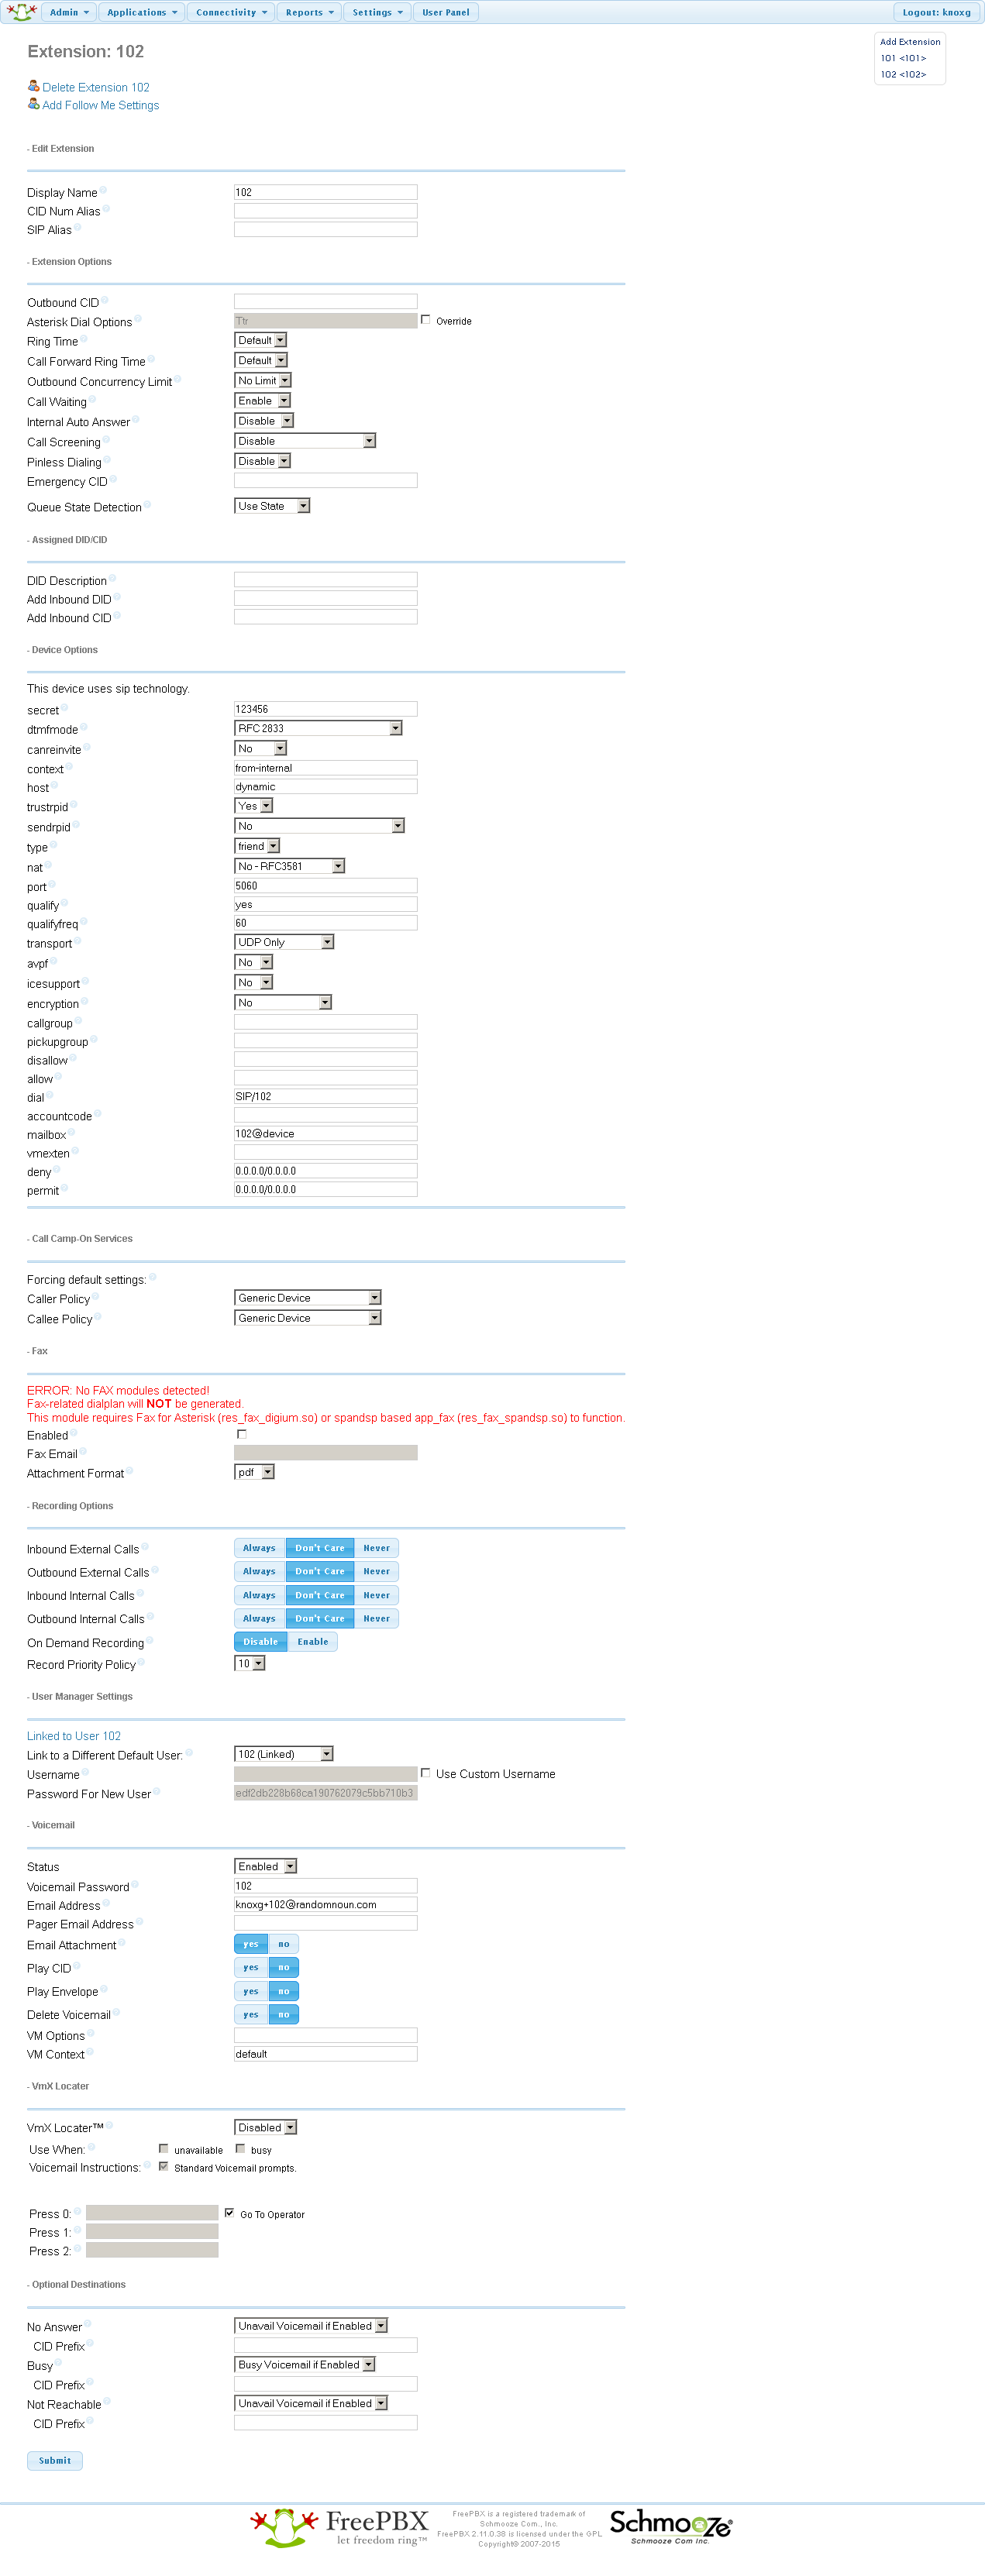
Go to Applications->Extensions and add the following extensions:
Then go to Applications -> Ring groups and add the following ring group:
| Group description | allRingGroup |
|---|---|
| Ring strategy | ringall |
| Extension List | 101 and 102 |
| Destination if no answer | Voicemail (101) |
| Screenshot | 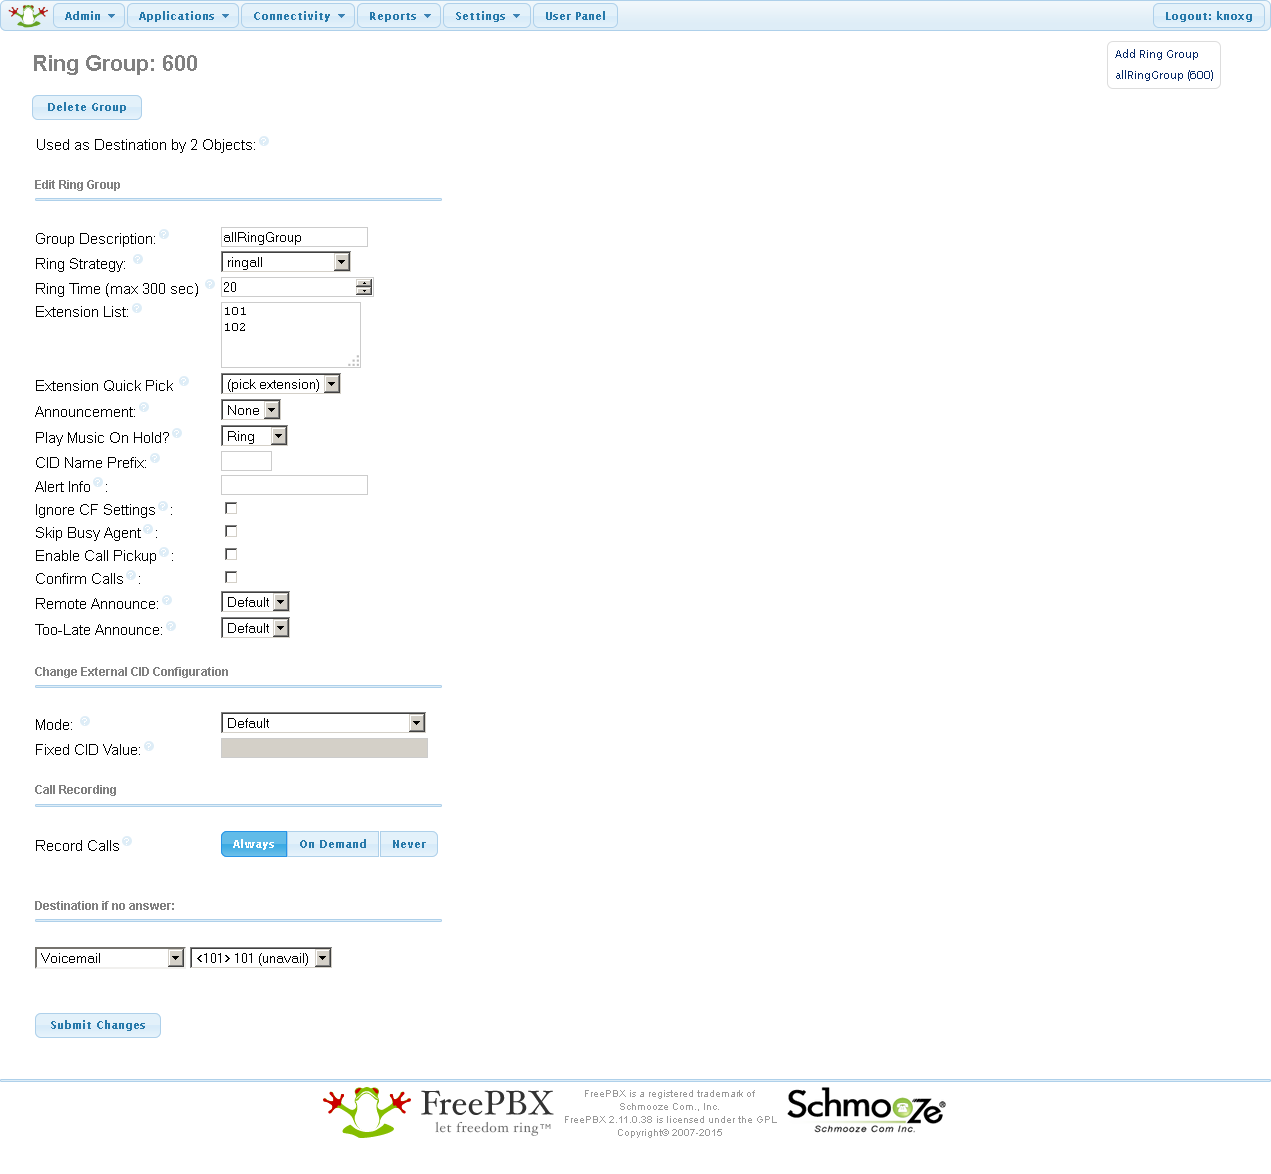 |
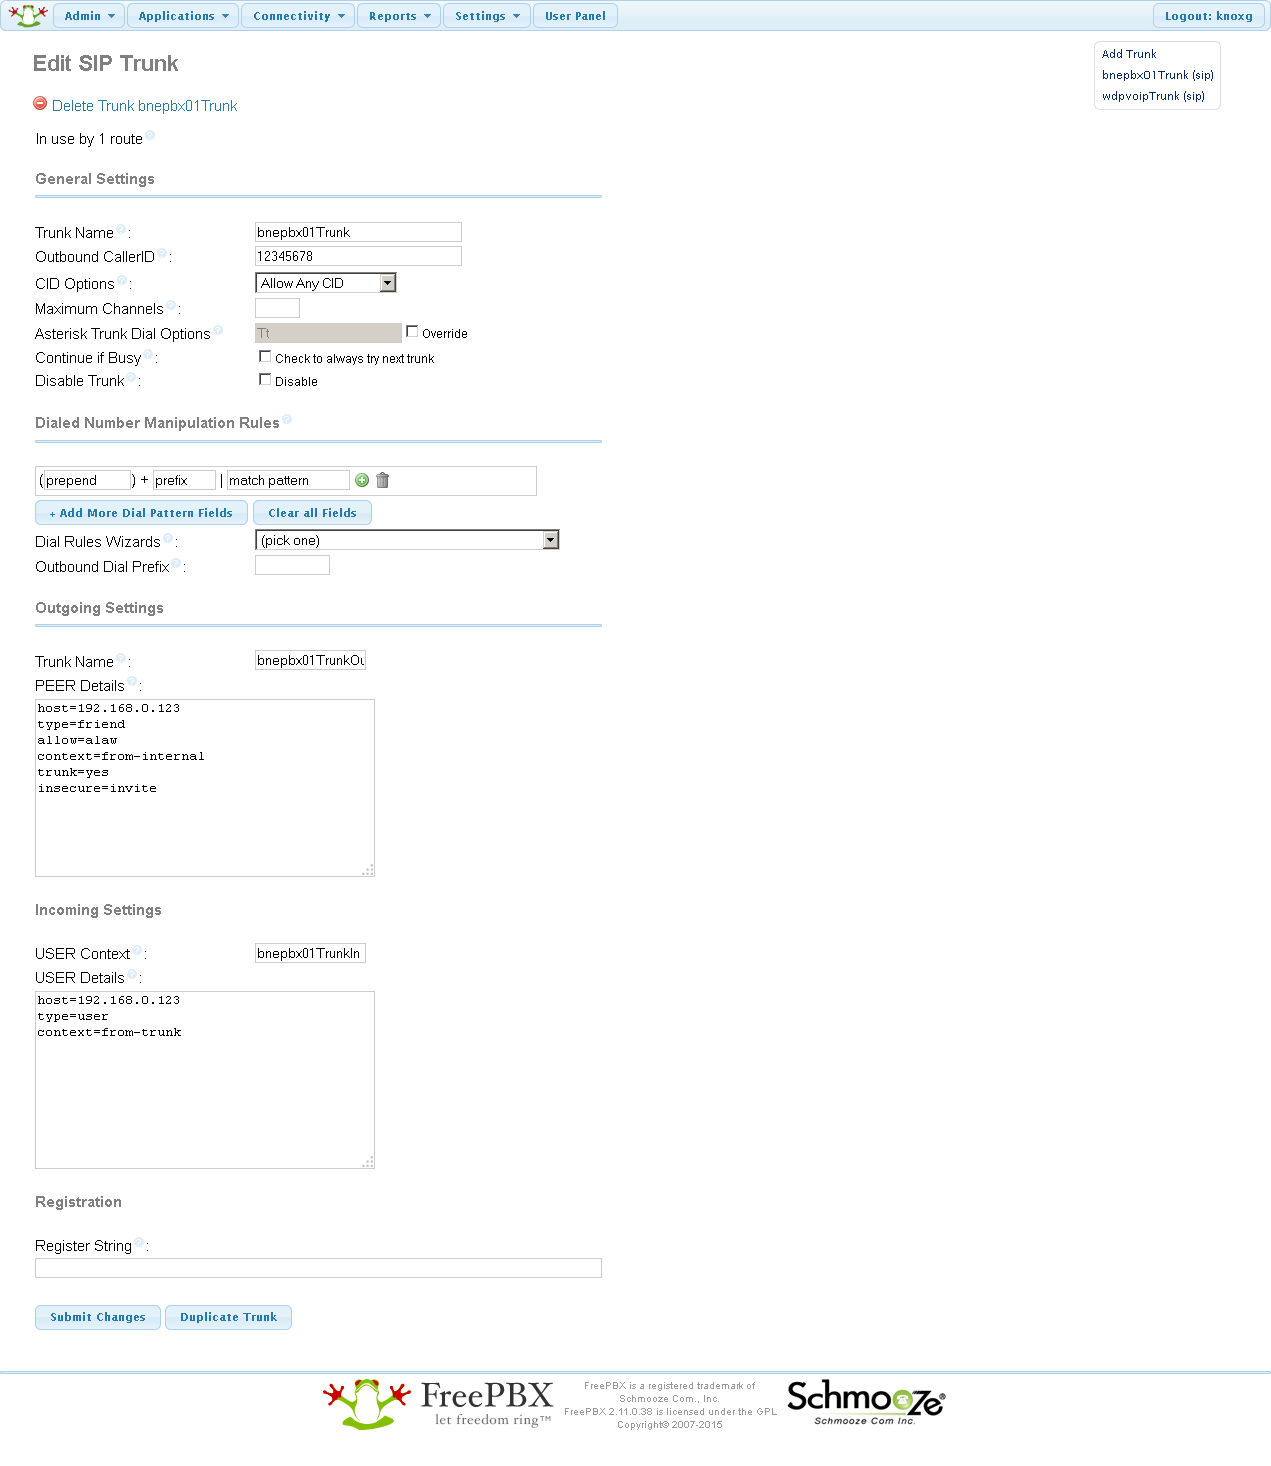
Go to Connectivity->Trunks and add the following trunks:
(The nnnn*nnnnn and yourWdpvoipSecret values should be supplied to you by wdpvoip during signup. The register string should all be in one line; there's also some additional instructions on their site )
Go to Connectivity->Inbound routes and add the following routes:
And Connectivity->Outbound routes
Yealink digital phone configuration
The phones will get an IP address via DHCP by default, so press the OK button on the front to find out it's IP address then login to it by browsing to http://(ip-address) and entering the username/password admin / admin
Give it a static IP address, using the following settings under Network -> Basic (or use DHCP if you feel like configuring your DHCP server instead).
| Extension | 101 | 102 |
|---|---|---|
| Mode (IPv4/IPv6> | IPv4 | IPv4 |
| IPv4 Config | Static IP Address | Static IP Address |
| IP Address | 192.168.0.121 | 192.168.0.122 |
| Subnet Mask | 255.255.255.0 | 255.255.255.0 |
| Gateway | 192.168.0.1 | 192.168.0.1 |
| Static DNS | On | On |
| Primary DNS | 192.168.0.1 | 192.168.0.1 |
| Secondary DNS |
Apply the settings, then login to it again on the new IP.
Download the latest firmware from the Yealink site, go to Settings -> Upgrade, and upload the new firmware to the phone.
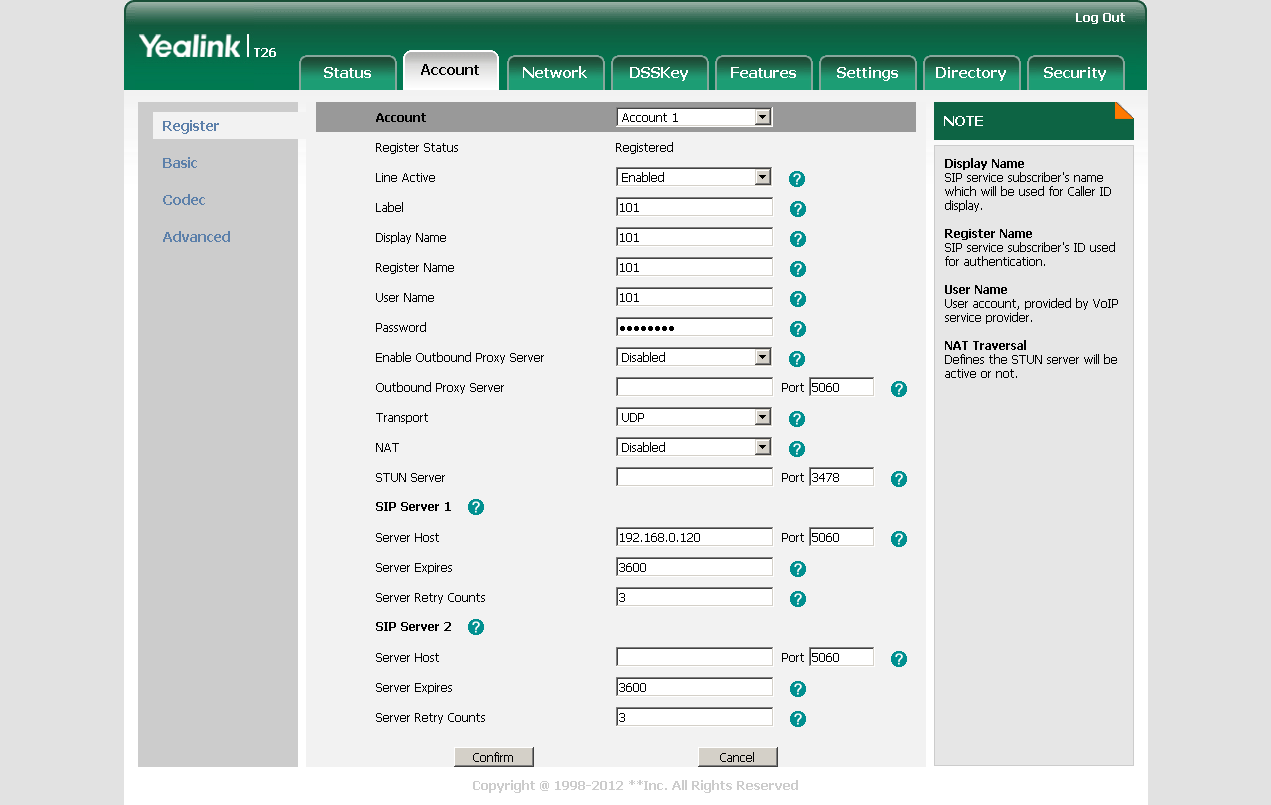
Once the phone reboots, login again, go to the Account tab, and create an Account for the phone so it can contact the asterisk server on bneast01.
Under Features -> General information, upload a custom logo if you like. You'll need a black and white bitmap for the image, and YealinkDOB.exe (requires Windows 7), written by a YeaLink forum member, which converts PNG and BMP files into the proprietary .DOB format used by the handset. You can ignore the conversion program supplied by the manufacturer, which it turns out is an absolute crock of shite and doesn't produce files that the handset will accept.
Analog phone configuration
Plug it in
Spend a while trying to get that to work
Obviously, none of this will work initially, so make a list of things that you expect to work and then cross them off as you spend ages sifting through the logs, trying different codecs, and slightly tweaking settings until you get something that vaguely works, and then Never Touch It Again.
Final Checklist
To give some idea what this configuration will actually do, this is the checklist that I used to whilst setting this up:
| Thing | Check? |
|---|---|
| Incoming calls to wdpvoip ( 07 5555 1111 ) go through asterisk, ring all digital handsets | □ |
| Incoming calls to telstra ( 07 5555 2222 ) go through asterisk, ring all digital handsets | □ |
| Outgoing calls from digital handset to outside world via wdpvoip (dial 0 for outside line) go through asterisk | □ |
| Outgoing calls from digital handset to outside world via telstra (dial 9 for outside line) go through asterisk | □ |
| Outoging calls from analog handset to outside world via wdpvoip (dial 0 for outside line) go through asterisk | □ |
| Outgoing calls from analog handset to outside world via telstra (dial 9 for outside line) works | □ |
| Internal calls from digital handset (101/102) to another digital handset works | □ |
| Internal calls from digital handset (101/102) to analog handset (103) works | □ |
| Internal calls from analog handset (103) to digital handset (101/102) works | □ |
| System handles multiple incoming calls | □ |
| System handles call transfers | □ |
| Call recording works | □ |
And, if you can check all those, then you can spend an astonishing amount of time writing that up.
Cheerio then.
Some reference material:
- MyPBX Soho User Manual
- Intercommunication between two MyPBX (via VoIP Trunking)
- Trunking FreePBX with Yeastar MyPBX
- FreePBX: Adding extensions
- FreePBX: Extensions Module - SIP Extension
- FreePBX: Call Recordings Module User Guide
- Asterisk: Asterisk Dialplan Patterns
[1] See page 10 of http://www.yeastar.com/download/PartI_MyPBX_SOHO_V4&V5_Administrator_Guide_en.pdf

